SSL disappear from the certificate list of Windows Server

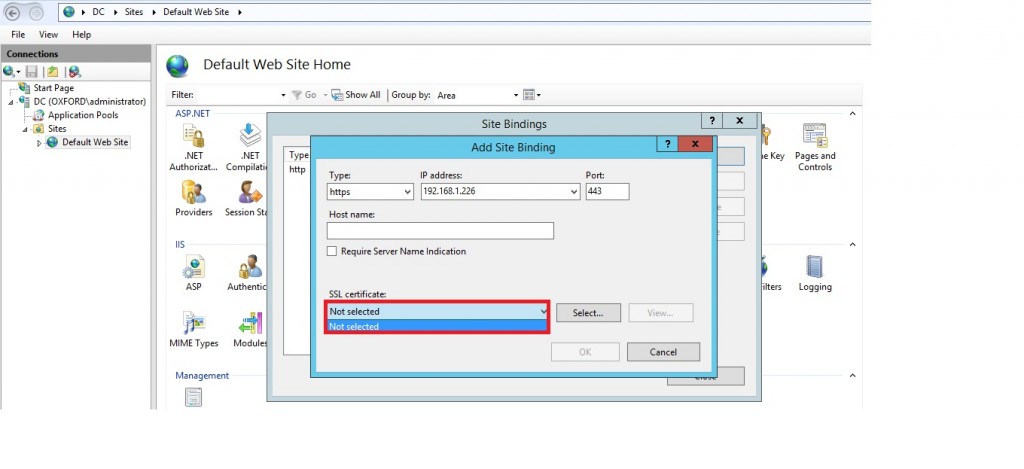
Users with Windows servers may occasionally encounter an issue when an imported certificate disappears from the list of server certificates. Most often, this happens right after completing certificate request in Internet Information Services (IIS) Manager .

The lists of server certificates in IIS contains only certificates that are assigned to the corresponding private key and generated along with the certificate signing request (CSR) user for activating a particular certificate. When the link between certificate and private key is broken for some reason, the certificate disappears.

In order to make the certificate reappear, you will need to force the link between the certificate and the private key using the following steps.

1. Open the Microsoft Management Console (MMC) on your server machine. Make sure that you are logged as administrator before proceeding. To open MMC, press Win+R combination, type in mmc and click OK.

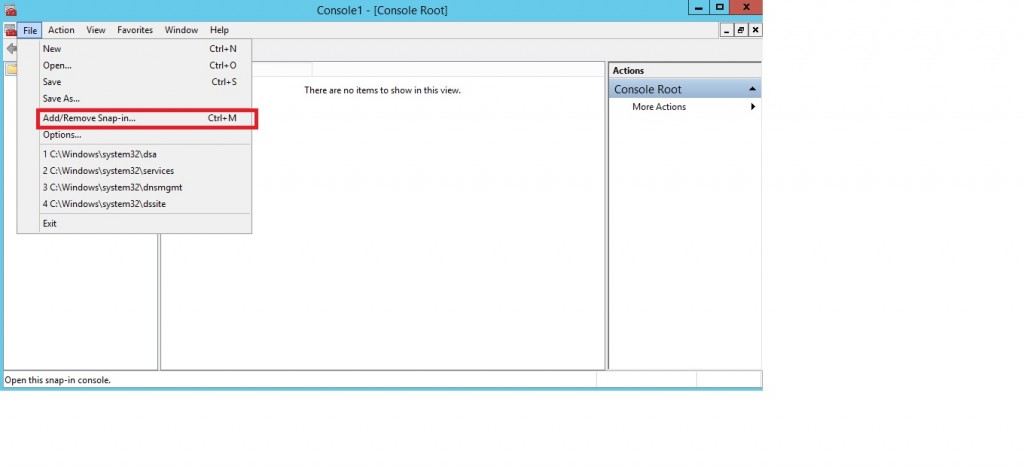
2. In File menu, select Add/Remove Snap-in.

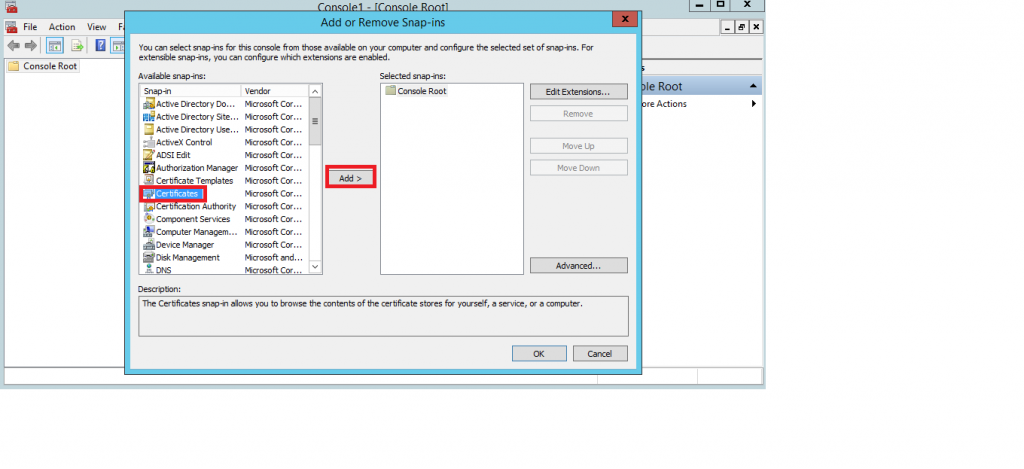
3. In the Add or Remove Snap-ins dialogue window, select Certificates and click Add.

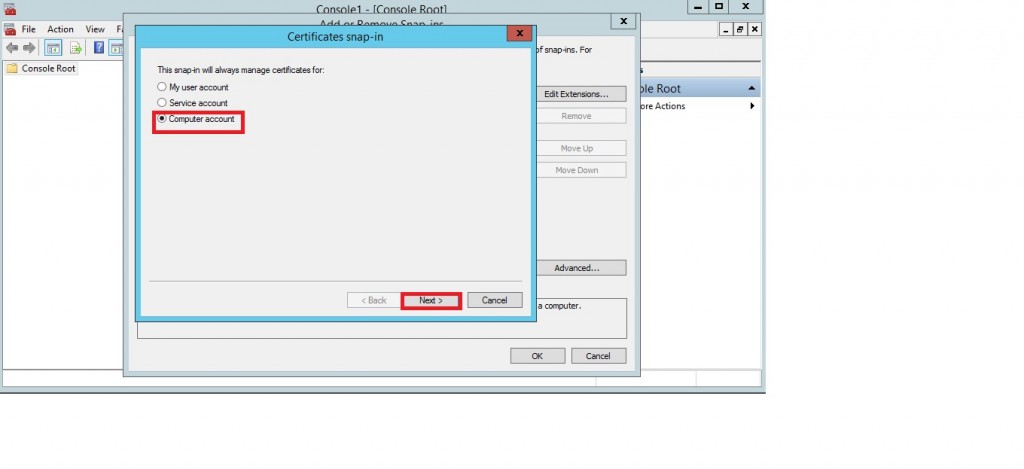
4.  Choose Computer Account in the Certificates snap-in window, click Next

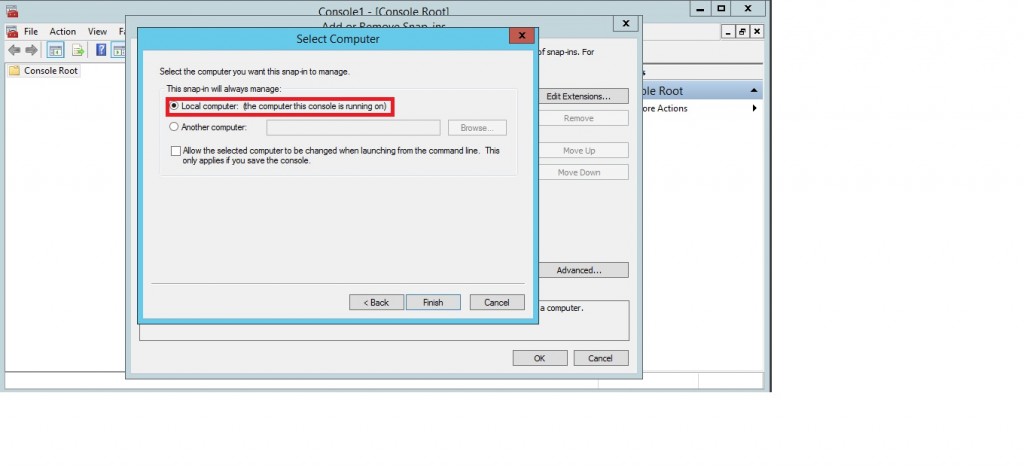
5. Tick Local computer in the Select computer box, then click on Finish.

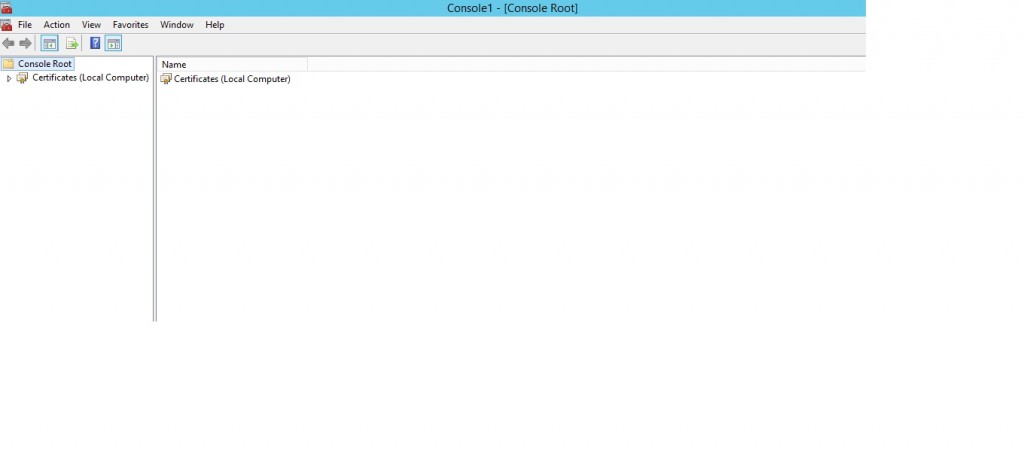
6. The required snap-in is selected now. Click the Ok button to proceed. The snap-in is added to console.

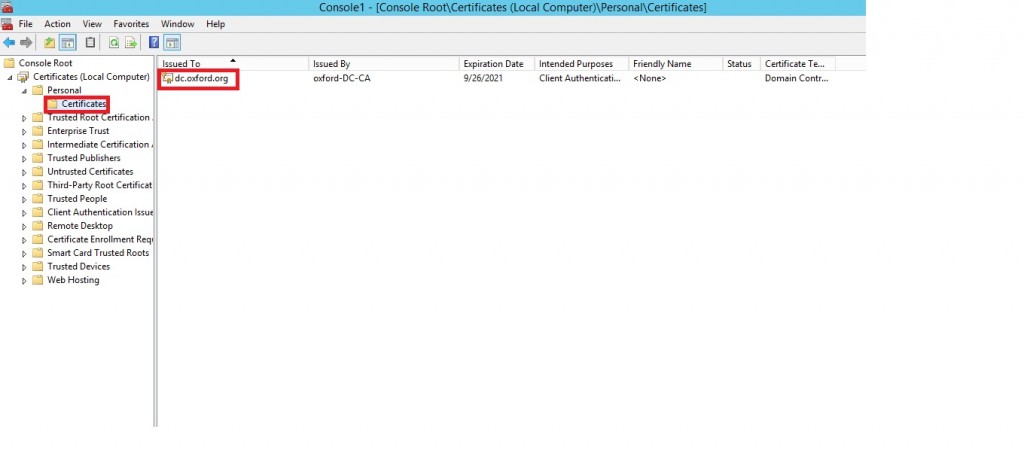
7.   Locate the certificate that was imported when completing certificate request. The certificate should be in Personal store. Note that icon of the certificate next to the domain name does not have a key on it. Means that no private key is assigned to the certificate.

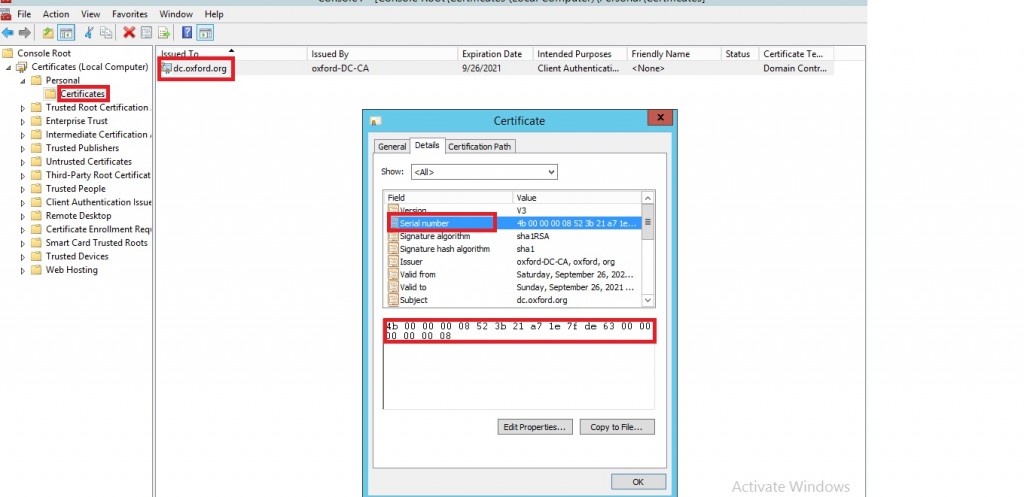
8. Double –click the certificate and go to Details tab.

9. In certificate details locate the serial number field, click on it and copy its value.

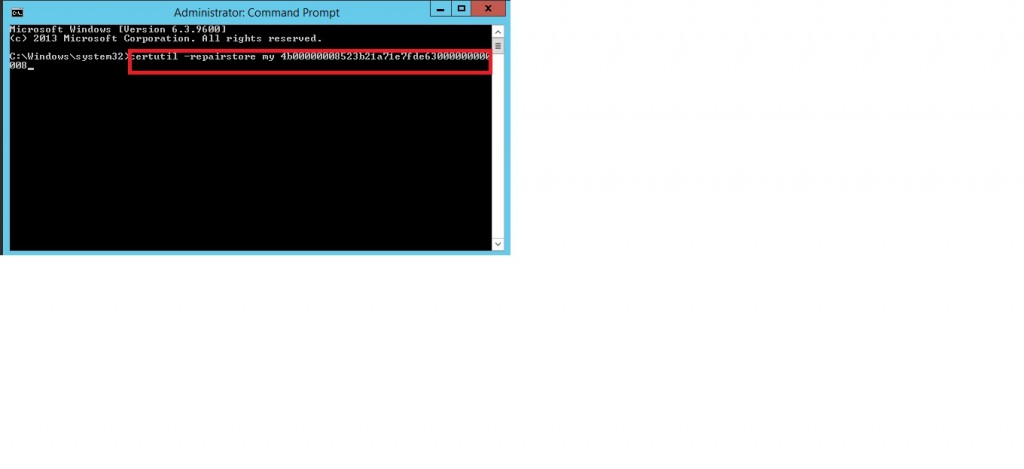
10.  Open Command Prompt by pressing Win+R and typing the cmd, then click OK. Type the command as below and press enter.

11. In the command prompt type : certutil –repairstore my Serial_number xxxxxxxxxxxxxxx.( Note: Make sure the serial number of your certificate does not contain any spaces. It should be single string of symbols.)

If you receive “Certutil: -repairstore command FAILED:0X800900100” error, this means that the certificate request was generated on another server, and the private key is absent on this one. You need to either transfer the key to your server via PFX file or create a new CSR code and reissue the certificate.

 

How to view OU linked GPO’s in Cionsystems GPO Manager.

To check which OU’s are linked to a Group Policy.

1. Login to Cionsystems GPO manager.

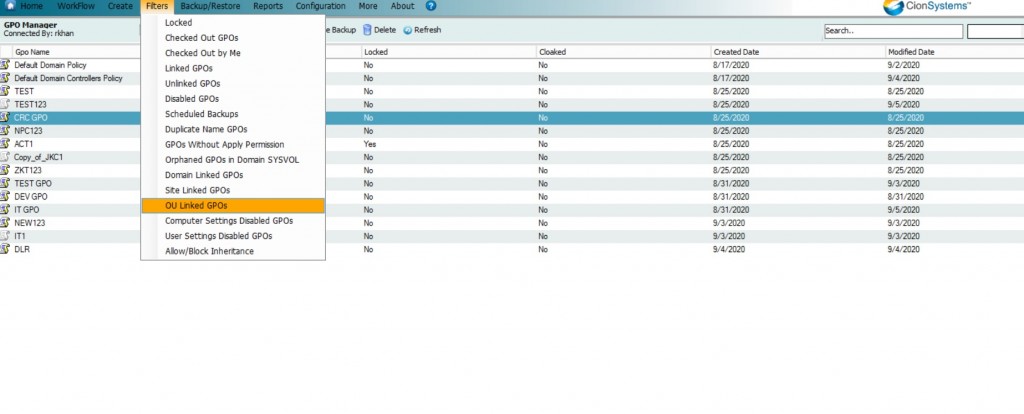
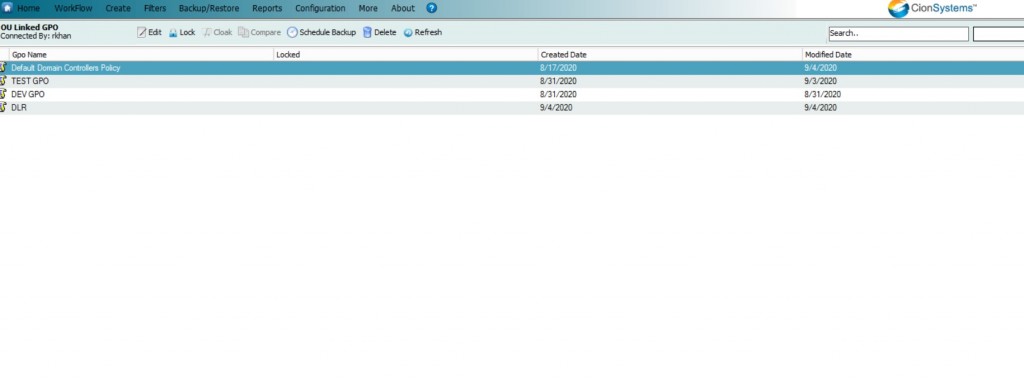
2. Go to Filters -> OU Linked GPO’s ->Click on OU Linked GPO’s.

3. When we click on OU Linked GPO’s it will display the list of GPO’s linked to OU’s.

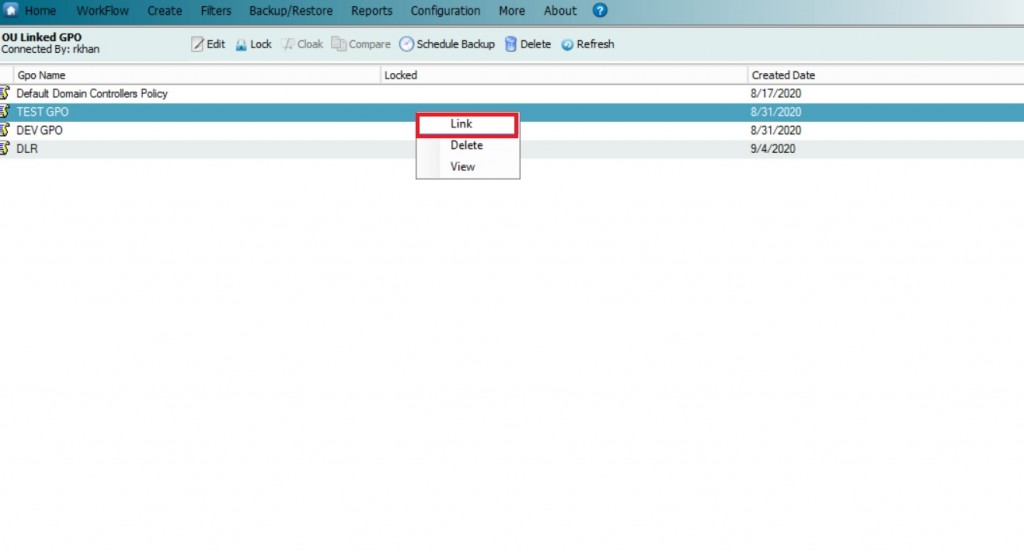
4. Right click on any GPO and select link option.

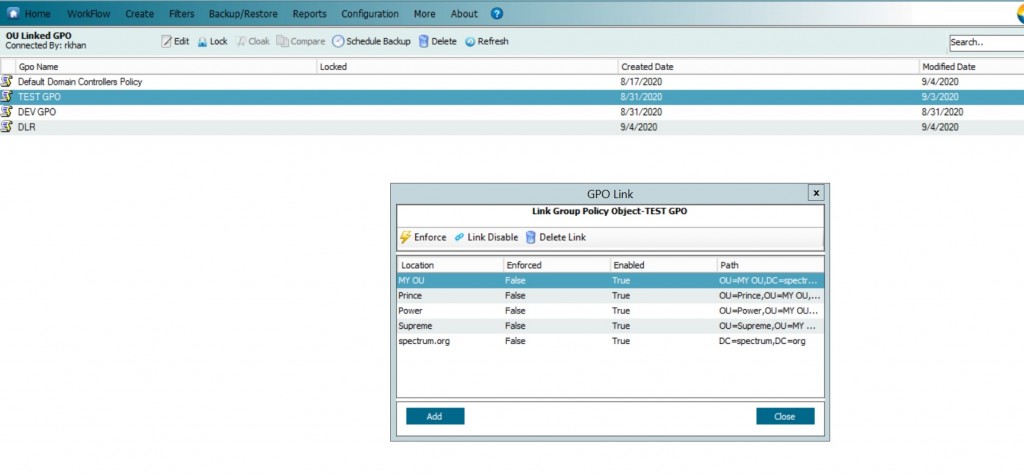
5. It will display the list of OU’s linked to a GPO as below.

In this window we can link any new OU’s  by clicking on Add or remove existing  OU’s link.


How to Restrict Group Policy for a User or Group in Cionsystems GPO Manager.

To restrict Group Policy for any user/group we need to follow the below steps.

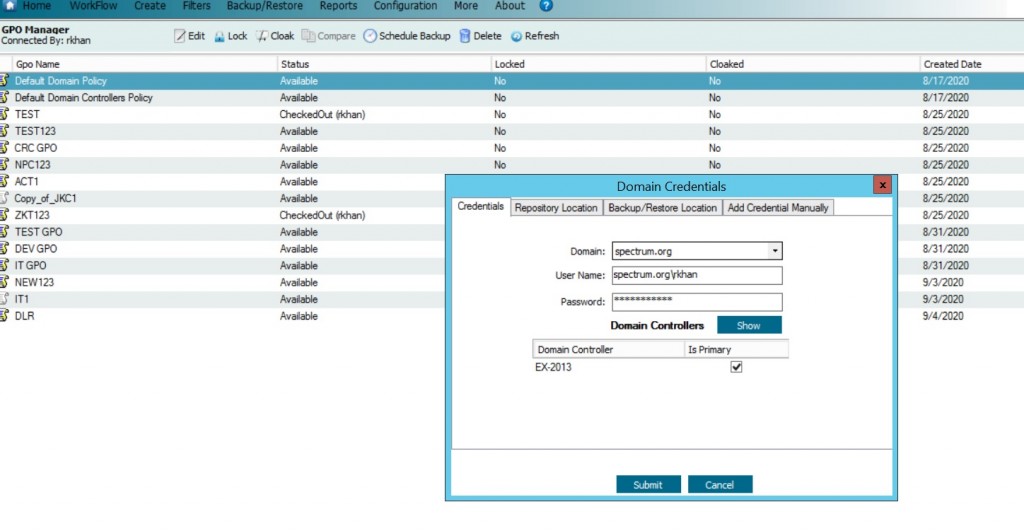
1. Login to Cionsystems GPO Manager.

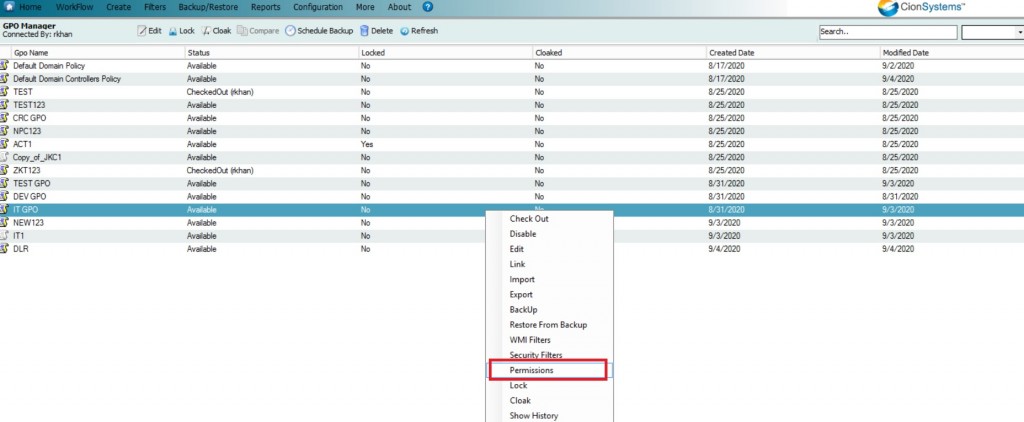
2. Select the group policy which has to be restricted and click on permissions tab.

3. From the GPO permissions  click on Add button and search for the user / group.

4.  Select the user / group and hit on ok.

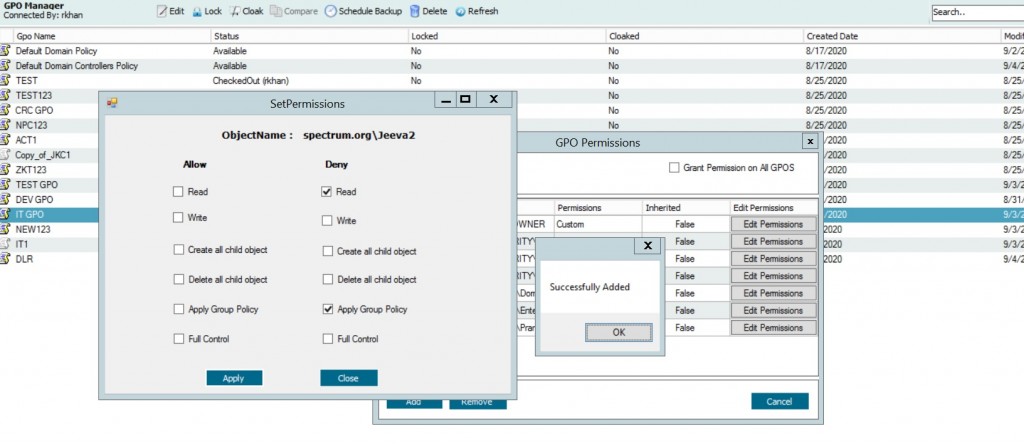
5. In set permissions tab select read and apply group policy options as deny and hit on apply.

6.  It will take some time to process.

7. Once permissions set successfully it will pop up the message as “successfully added” and hit on ok.

8. Now added user /group is skipped by applying this group policy settings.

9. Once the permission is added then type the command  gpupdate/force in the command prompt.

How to check which GPO has the settings.

1. Login to Cionsystems GPO.

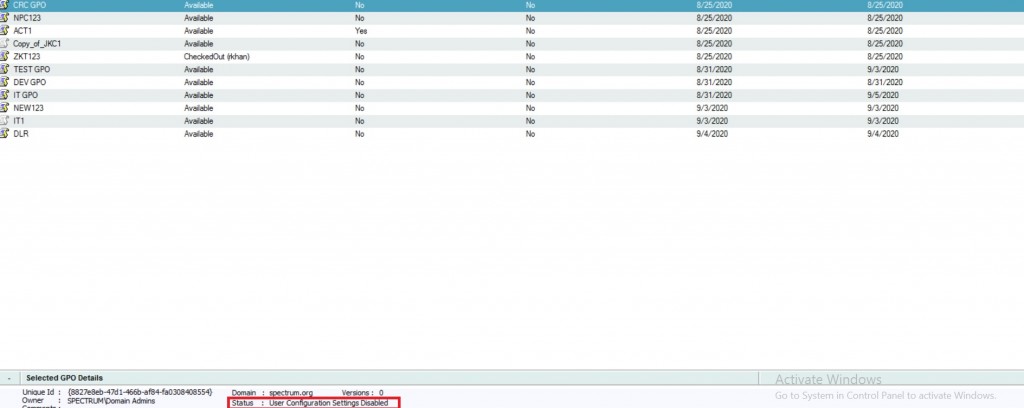
2. Select any GPO and check the status of GPO.

3. In above GPO Computer Settings User Configuration Settings were disabled.

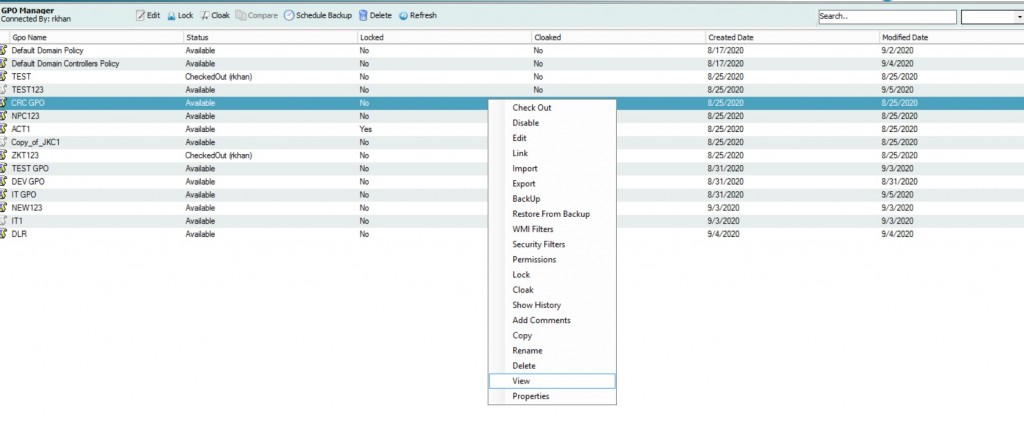
4. To verify the GPO settings click on view option by right clicking on GPO.

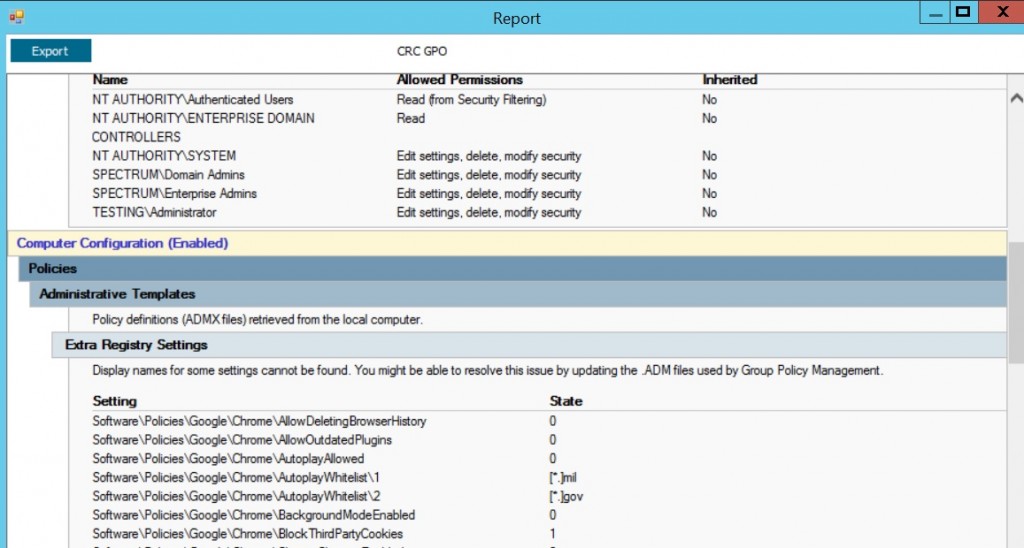
5. As  below report is displaying only Computer Settings hence it conclude that GPO is having Computer settings Enable and User Settings  Disable.
6. In the same way we can check other GPO’s status also.


Account has been blocked contact tenant administrator error when configuring Azure AD/Office365 account in Cionsystems Enterprise Self Service or during AzureAD/Office365 login.

For the above error please follow the below steps to resolve the issue.

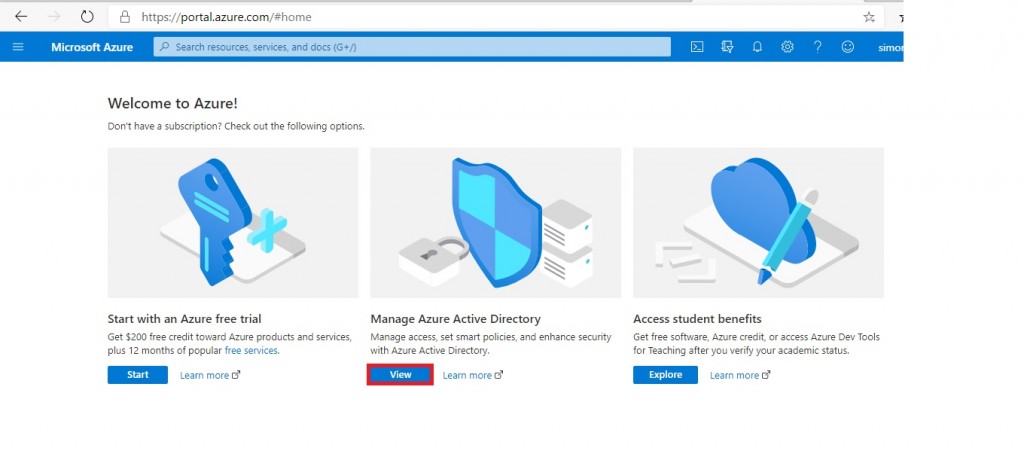
Login to the Microsoft Azure Account portal with administrator access account.

Url to login is   https://portal.azure.com

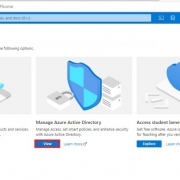
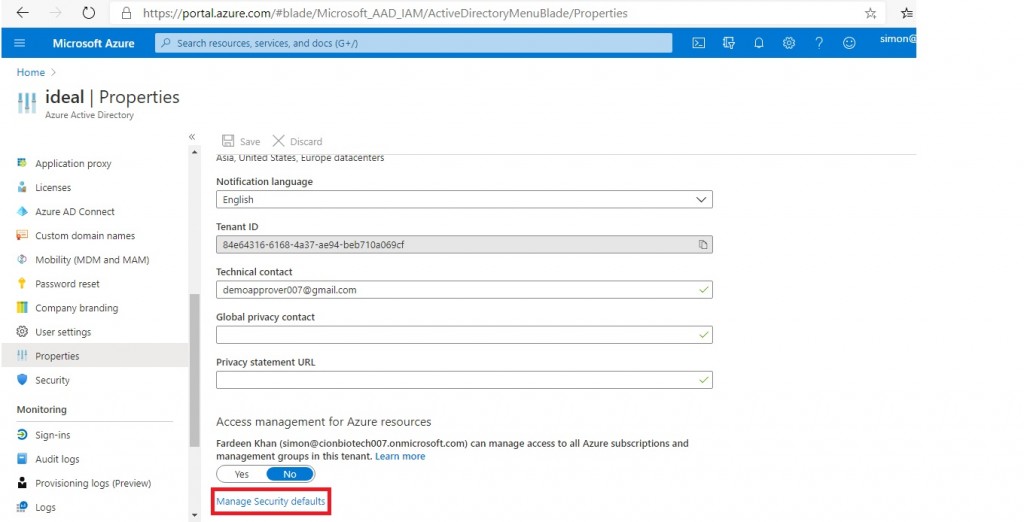
After login –>  Click on view Manage Azure Active Directory as shown in the below image.

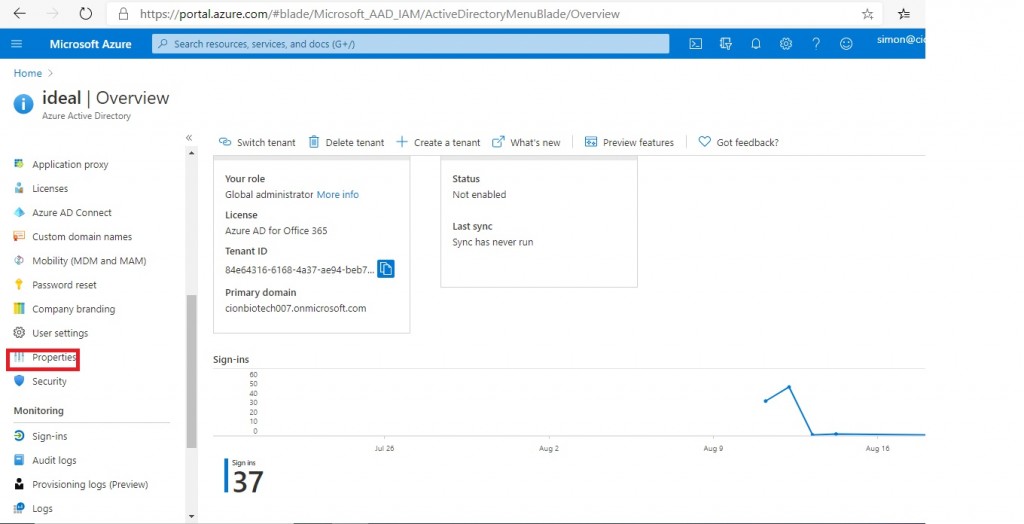
Select properties.

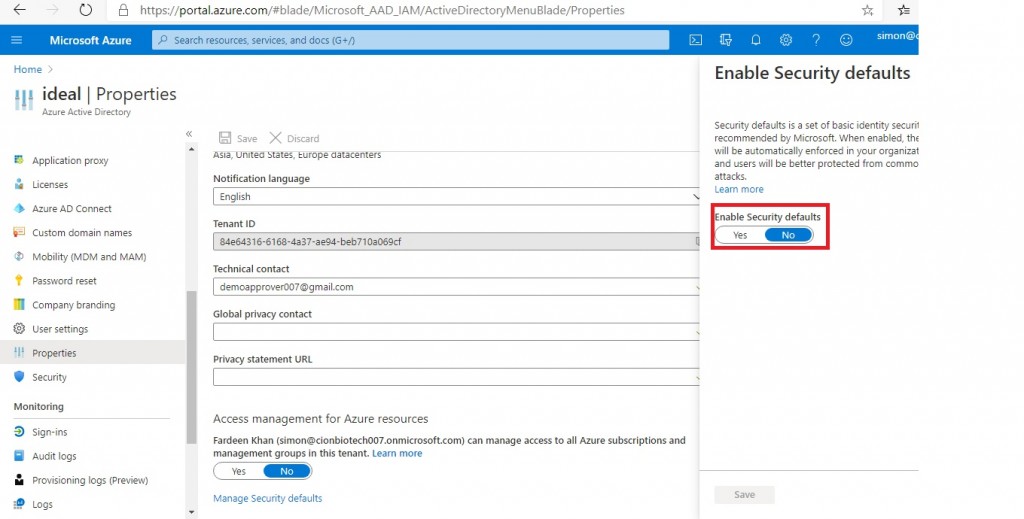
Click on Manage Security defaults.

By default Enable Security defaults it will set to yes change it to No. this will allow you to configure AzureAD / Office365 account successfully in Enterprise Self-Service.

Active Directory Domain Recovery Step by Step.

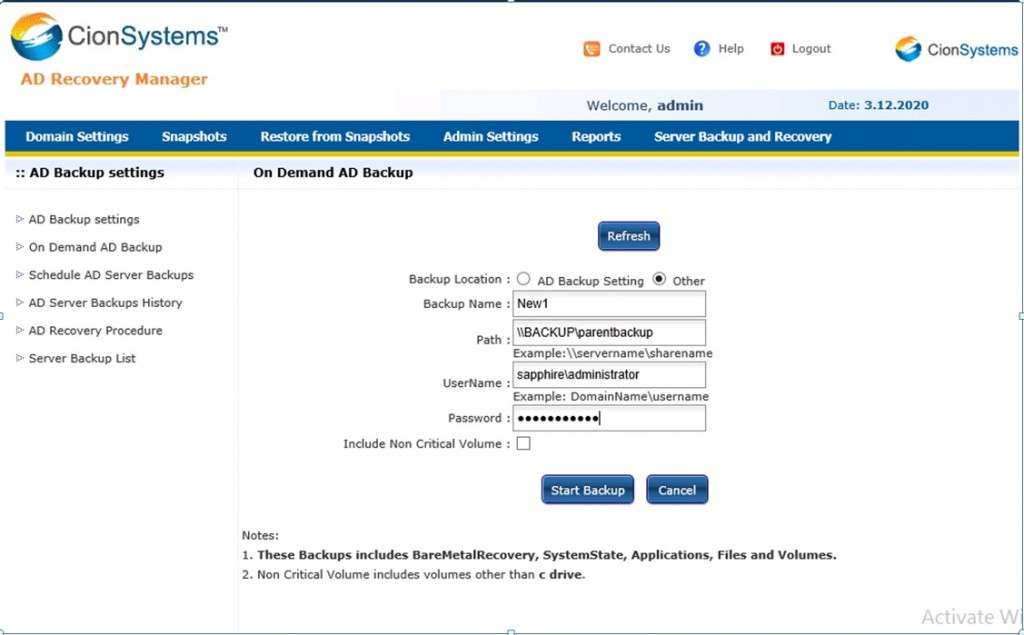
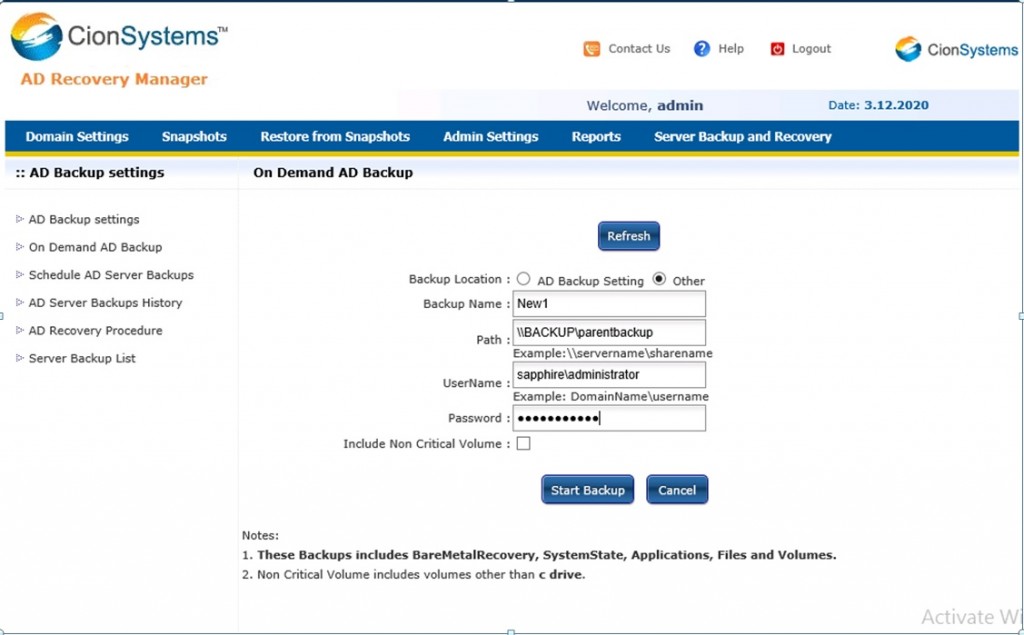
1. For restoration of  domain firstly we need to take the On Demand backup / Schedule Server backup.

2. If the backup location  is on the same machine no need to  configure any settings.

3. If the backup is on the remote shared  location then trust relationship must be there between parent domain and shared folder location domain.

4. Trust relationship should be configured. Please refer our article to configure trust relationship at the below given link.Create Trust from Remote  shared location domain.Configured the trust where the shared folder had been created.

http://blog.cionsystems.com/?p=1086

5. Once Trust is configured on remote shared folder domain then start the system state backup process from domain using CionSystems  AD Recovery Manager on Demand backup / Schedule backup.

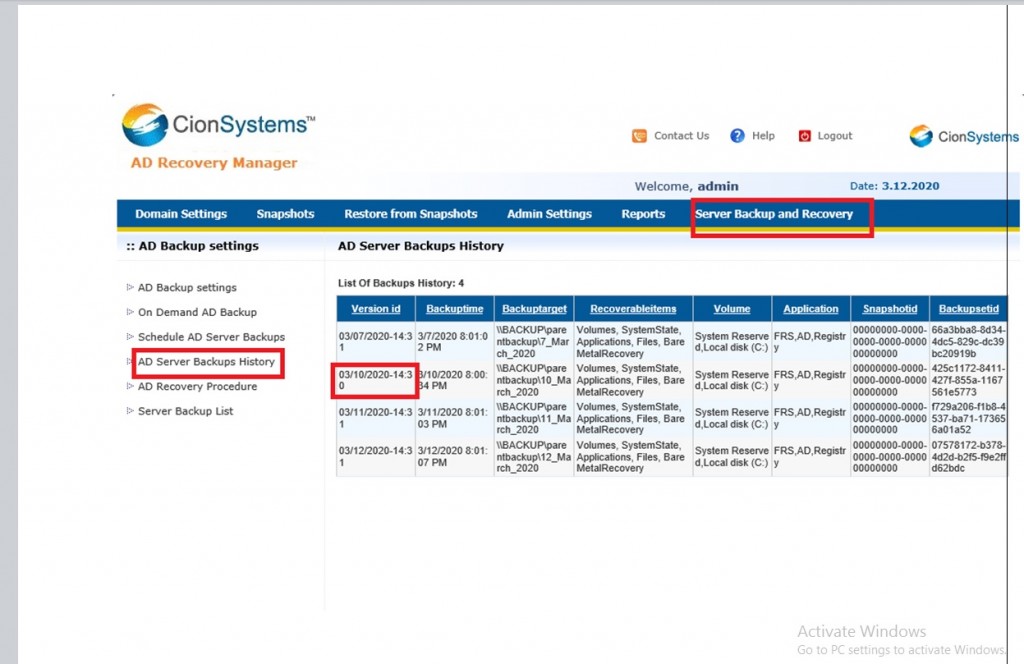
6. Once backup is completed  go to AD Recovery Manager –>Server backup and Recovery –> AD Server backup’s history  and note down the version ID of the respective domain.

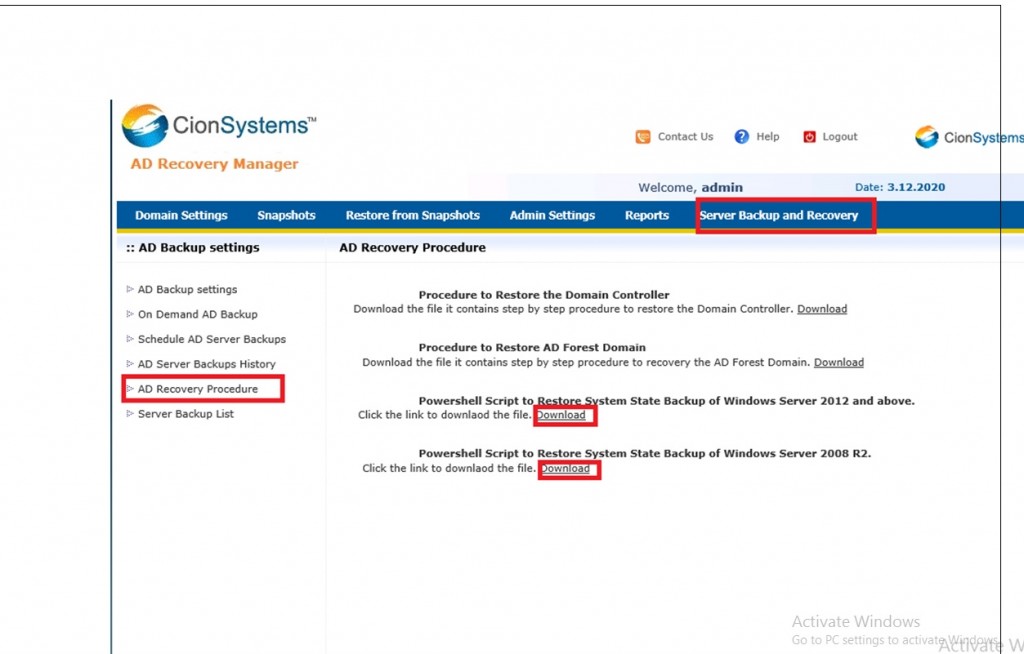
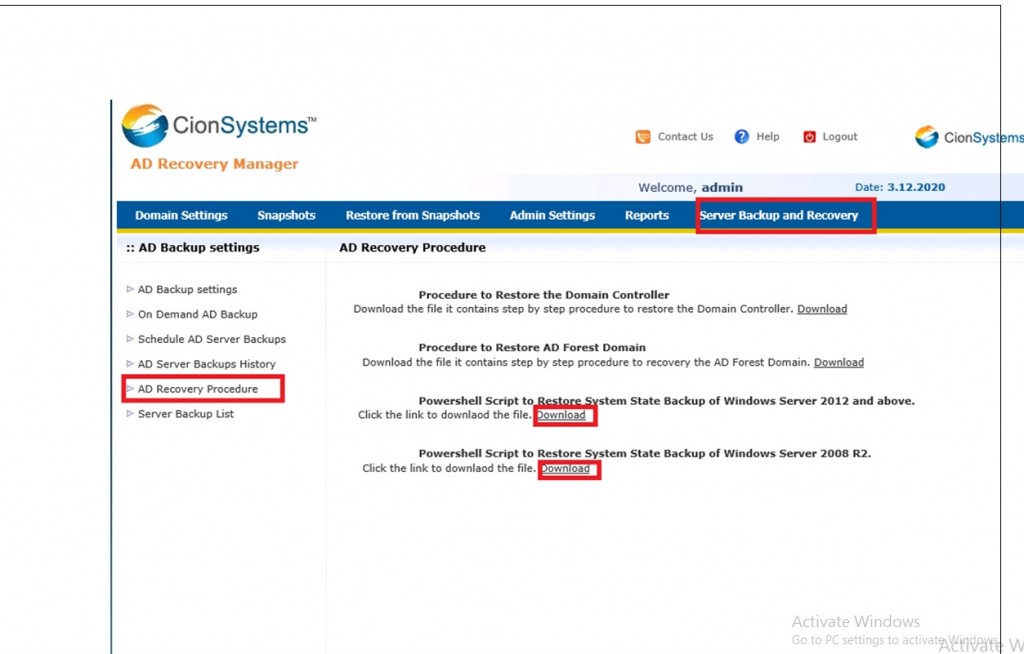
7.  After noting down the  Version ID.Go to AD Recovery Procedure tab and download Power Shell scripts .If  the DC  is 2012 and above download the power shell  script first.

8. If DC is 2008 and above then download  the second script as shown below.

9. If the domain is dead /crashed then follow the below steps  for restoration.

10. Let’s start with the restoration of DC.

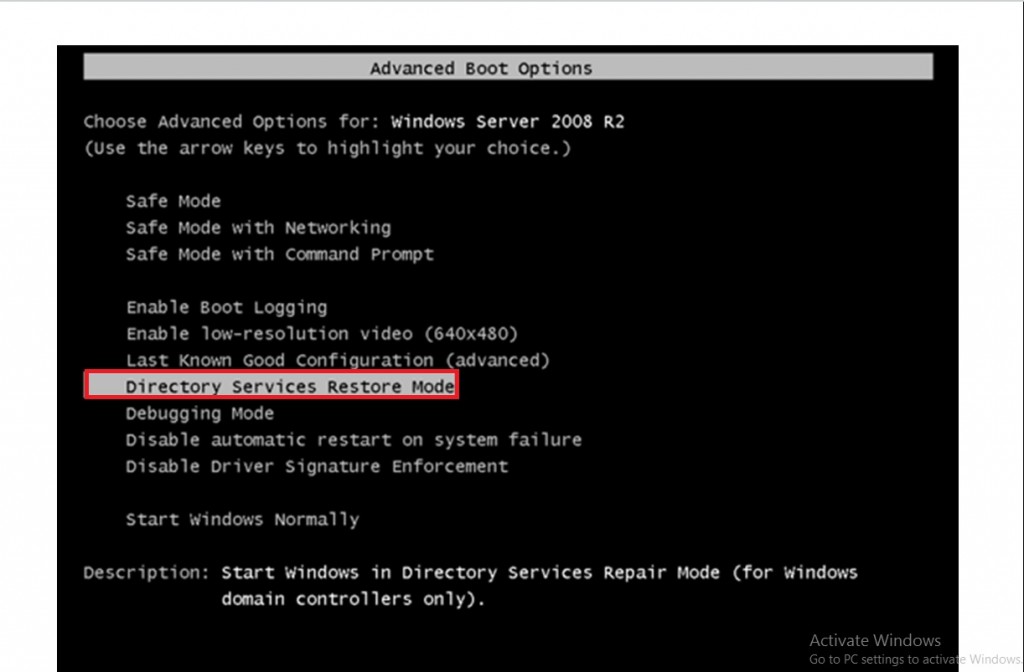
11. Login to your machine in Directory Services Restore Mode.

12. If Directory Services Restore Mode is not enabled in safe mode then go to run command in normal mode and type                        msconfig and hit enter and reboot the machine.

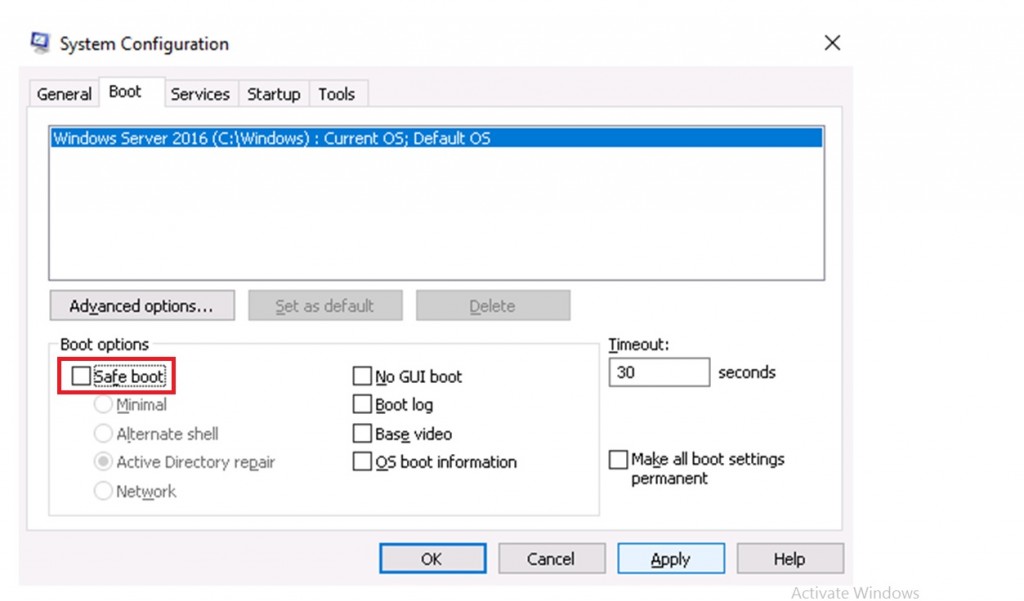
13. Go to boot tab select  Safe boot  –>Select Active Directory Repair radio button and hit on Apply –>Click OK.

14. Click on restart button.The machine reboots in Directory Services Restore Mode.

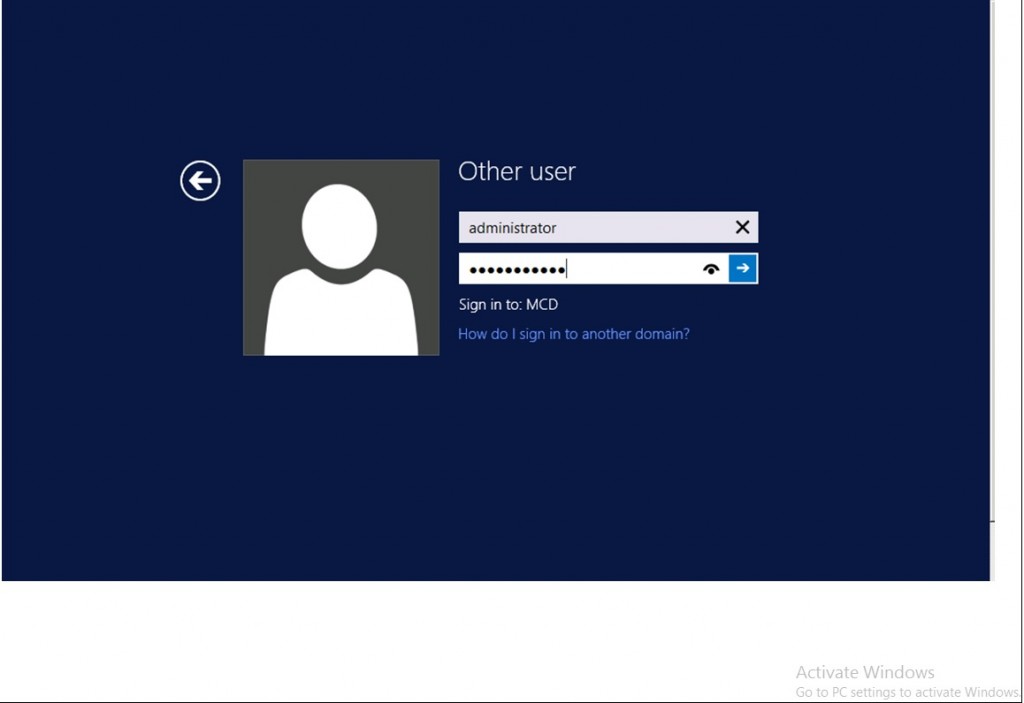
15. Login to the machine with Local Admin account into Active Directory Services Repair mode.

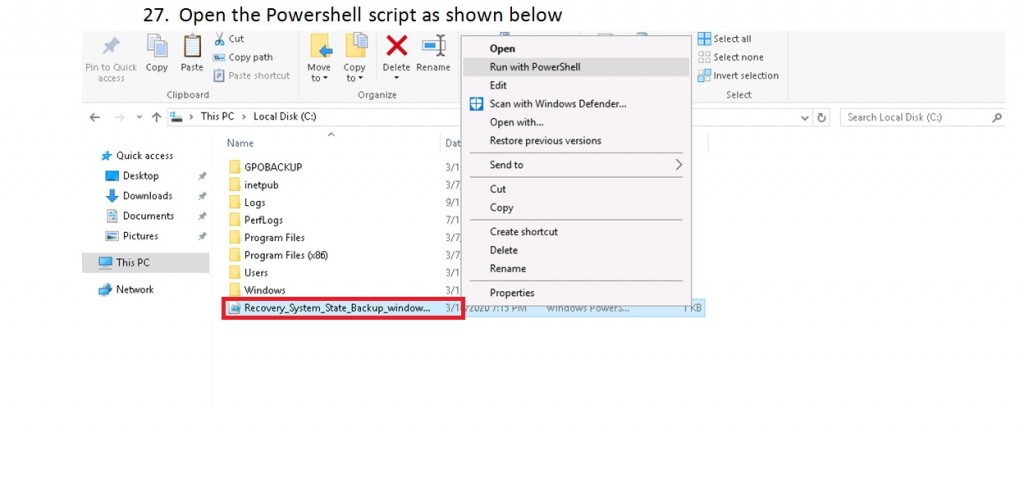
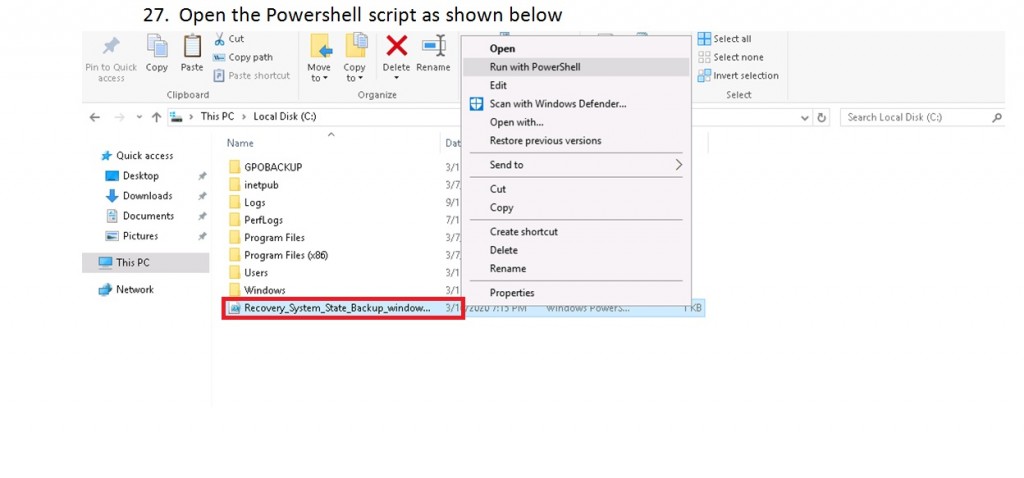
16. After  login into Repair Mode  open the Script which was downloaded from the AD recovery manager.

17. Open the Power Shell script as shown below.

18. After opening the  Power shell script type “Y” and hit Enter.

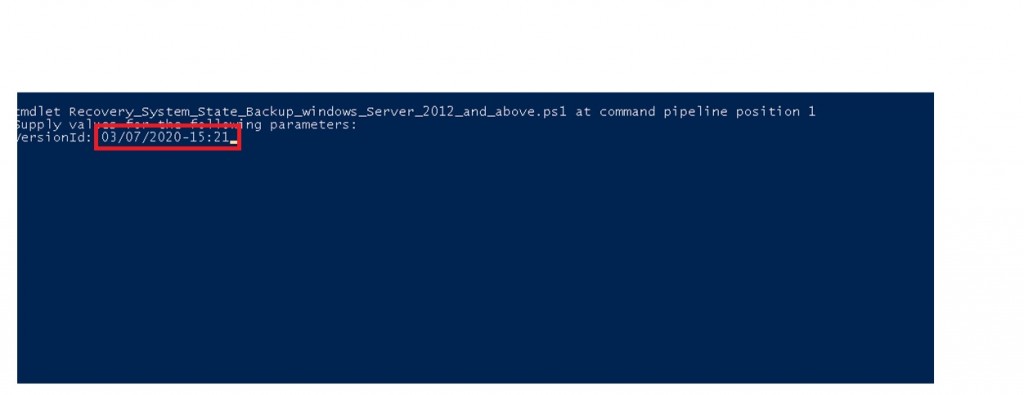
19. Enter Version ID which was copied and hit on Enter key.

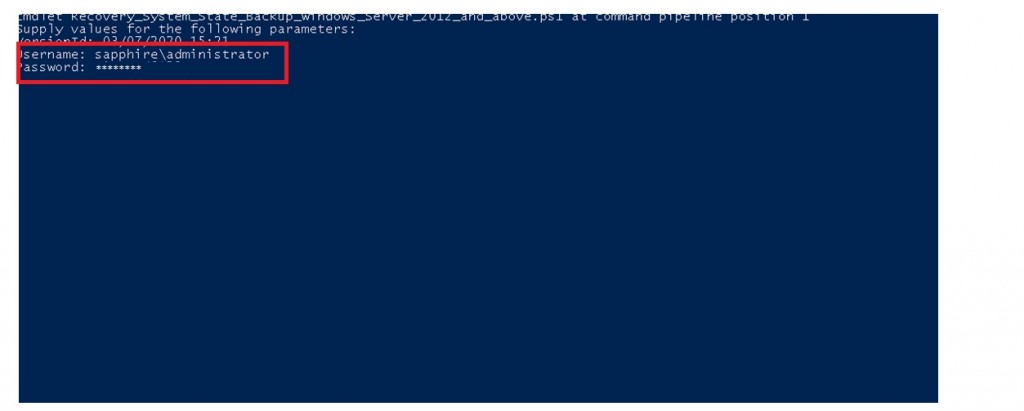
20. Enter the credentials User Name and Password where backup exist as below.

20. Hit Enter key.

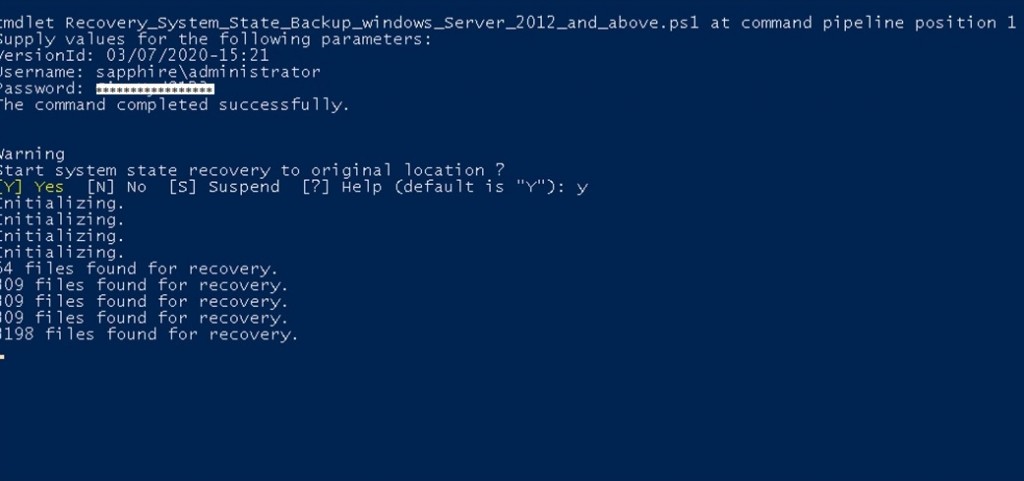
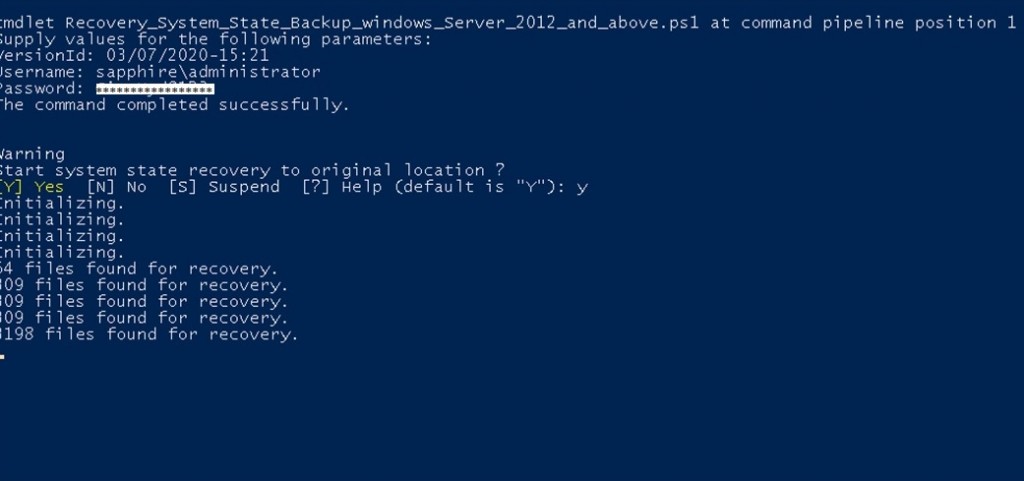
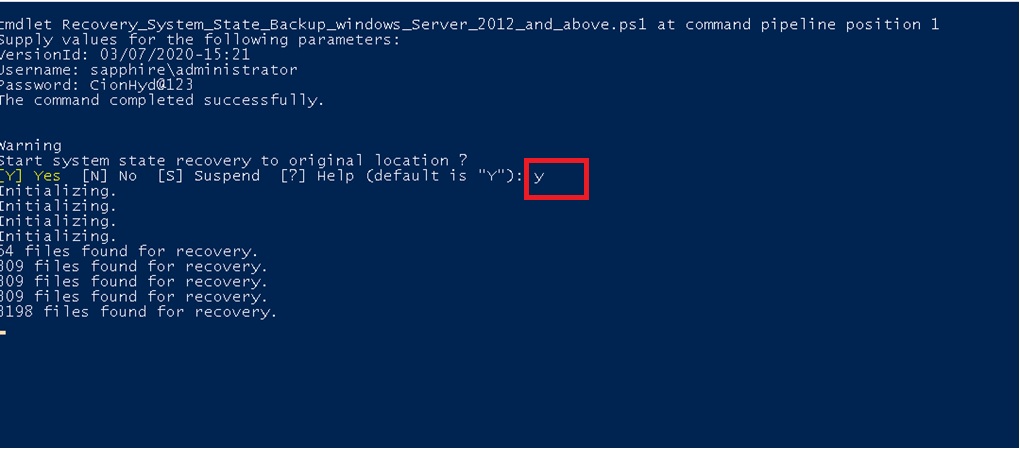
21. Enter”Y” and hit Enter key. After hitting Enter key restoration process will start as shown below. It will display number of            files recovered.

22. It will display the recovery  % status  once restoration starts.

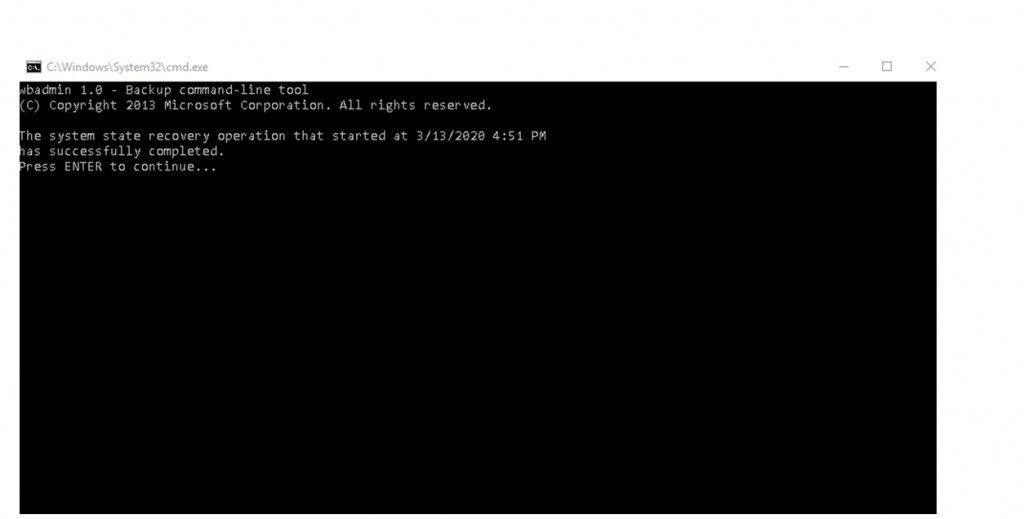
23. Once Recovery is completed system gets reboot after login with local admin account it goes to command prompt shown                 below.

24. Press Enter button and restart the machine in normal mode by unchecking  Active directory Repair option in system                     configuration tab.

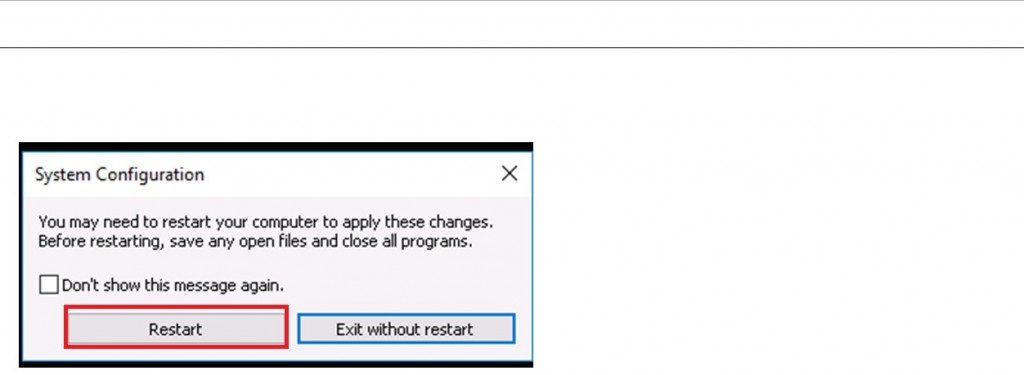
25. Hit on apply and click on OK  it will pop up a window to restart the machine.

26. Click on Restart button.Machine will reboot in normal mode.

27. After reboot login with domain admin account.This is how the DC is restored.

Active Directory Forest Recovery step by step.

1. For restoration of forest domain firstly we need to take the On Demand backup / Schedule Server backup of parent (Main) domain and Child domains separately in different folders.

2.  If the backup location  is on the same machine no need to  configure any settings.

3. If the backup is on the remote shared  location then trust relationship must be there between parent domain and shared              folder location domain.

4. Trust relationship should be configured. Below are the steps to configure trust relationship.Create Trust from Remote  shared location domain.Configured the trust where the shared folder had been created.

5. Go to Administrative tools –> Active Directory Domains and Trusts.

6. Right click on domain and go to properties.

7. Go to Trusts –> Click on New Trust and hit on OK button.

8. Enter the fully qualified domain name  of Parent /Child domains and hit on next button.

9. Select realm trust and hit on next—> Again next.

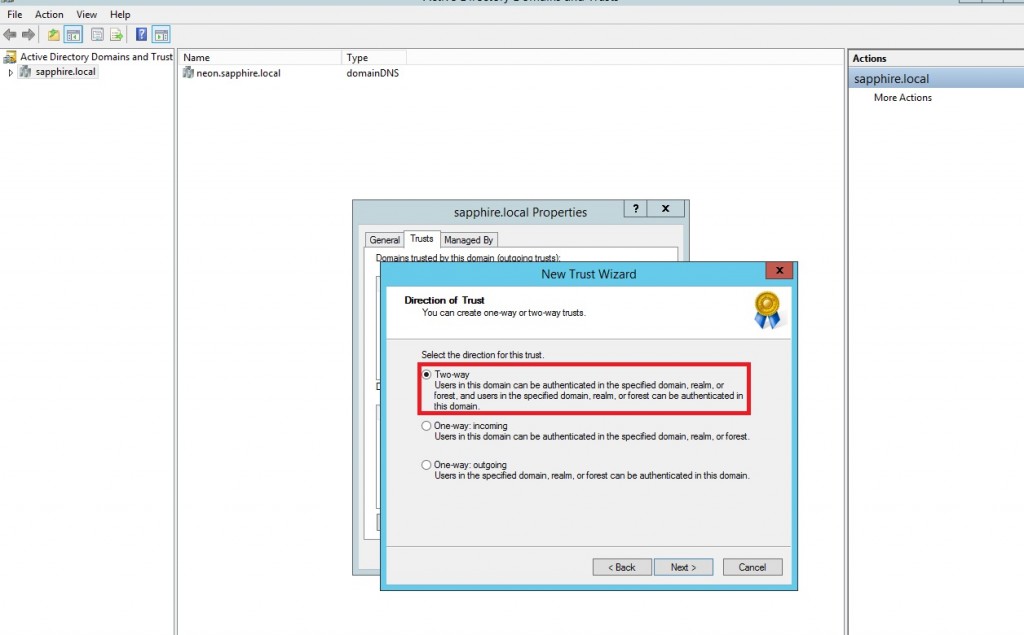
10. In direction of trust page select Two way option and hit on next button.

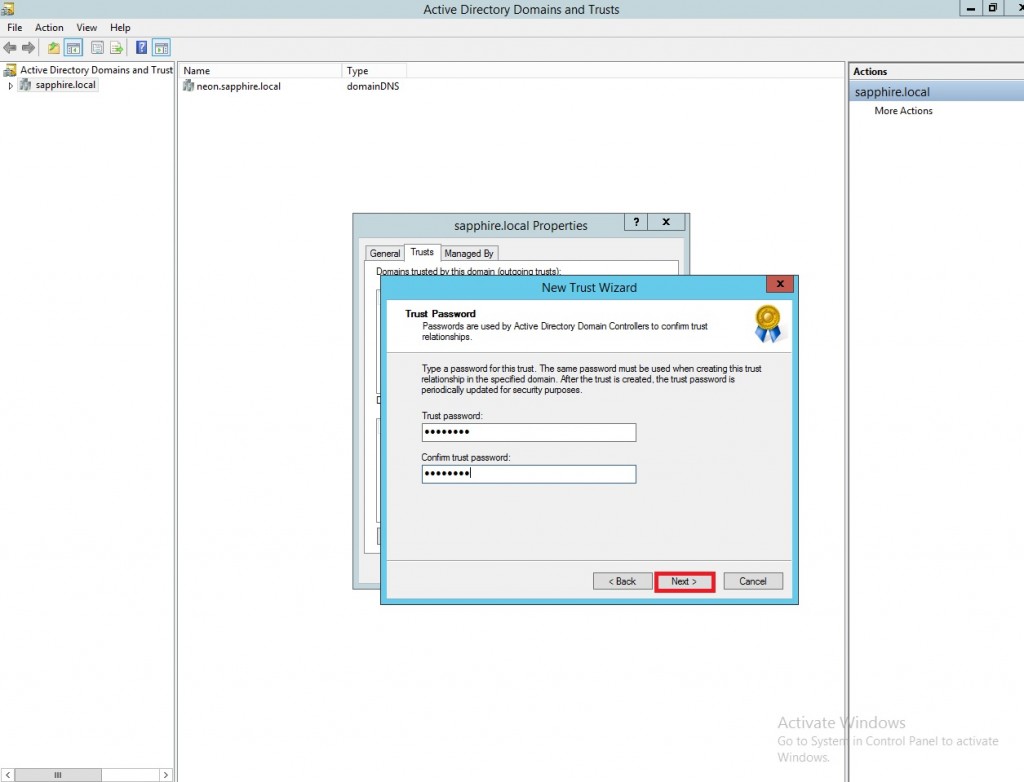
11. Enter the Trust Relationship password and hit on next.

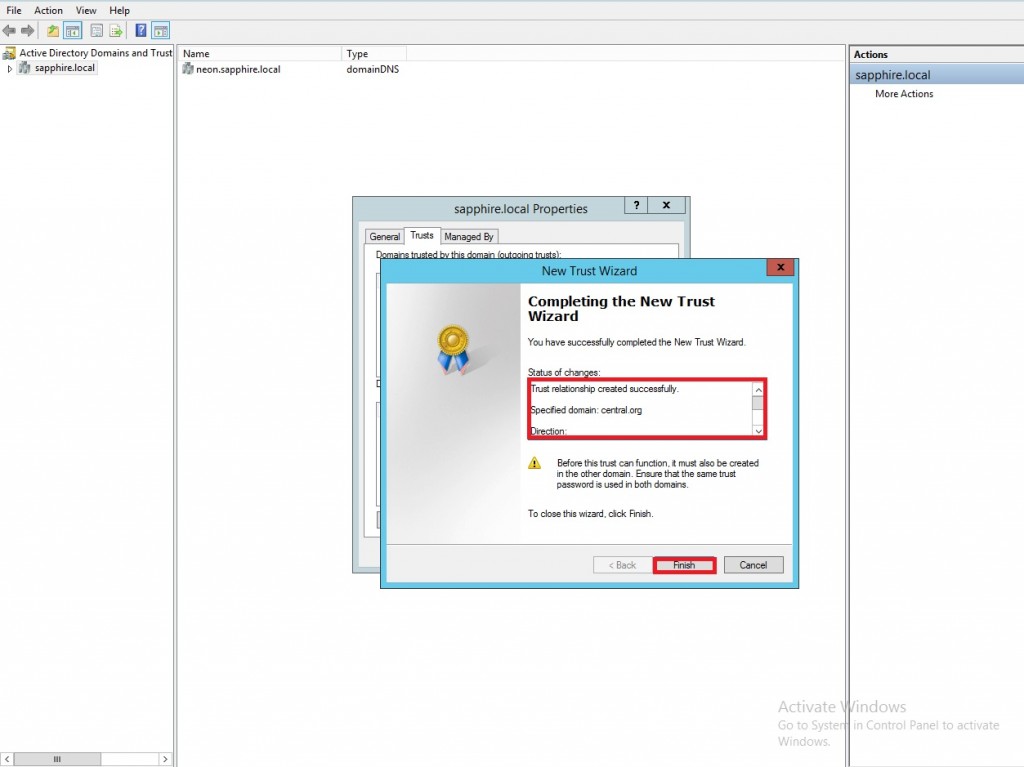
12. After successful configuration it will display the message “Trust relationship created successfully as below.

13. Click on Finish button.

14. Once Trust is configured on remote shared folder domain then start the system state backup process from parent domain and  then child domains using CionSystems  AD Recovery Manager on Demand backup / Schedule backup.

15. Once backup is completed  go to AD Recovery Manager –>Server backup and Recovery –> AD Server backup’s history  and note down the version ID of the respective domain.

16. After noting down the  Version ID.Go to AD Recovery Procedure tab and download Power Shell scripts .If  the Forest DC  is 2012 and above download the power shell  script first.

17.  If DC is 2008 and above then download  the second script as shown below.

18.  If the parent domain or child domains is dead /crashed then follow the below steps  for restoration.

19. If you need to restore complete Forest.First restore the parent domain afterwards child domains one by one.

20. If  Child domains  need  to  be restored then restore child domains only.

21. Let’s start with the restoration of forest DC.

22. Login to your machine in Directory Services Restore Mode.

23.  If Directory Services Restore Mode is not enabled in safe mode then go to run command in normal mode and type                        msconfig and hit enter and reboot the machine.

24. Go to boot tab select  Safe boot  –>Select Active Directory Repair radio button and hit on Apply –>Click OK.

25. Click on restart button.The machine reboots in Directory Services Restore Mode.

26. Login to the machine with Local Admin account into Active Directory Services Repair mode.

27.  After  login into Repair Mode  open the Script which was downloaded from the recovery manager.

28. Open the Power Shell script as shown below.

29. After opening the  Power shell script type “Y” and hit Enter.

30. Enter Version ID which was copied and hit on Enter key.

31. Enter the credentials User Name and Password where backup exist as below.

32. Hit on Enter.

33. Enter”Y” and hit Enter key. After hitting Enter key restoration process will start as shown below. It will display number of             files recovered.

34. It will display the recovery  % status  once restoration starts.

35. Once Recovery is completed system gets reboot after login with local admin account it goes to command prompt shown                 below.

36. Press Enter button and restart the machine in normal mode by unchecking  Active directory Repair option in system                       configuration tab.

37. Hit on apply and click on OK  it will pop up a window to restart the machine.

38. Click on Restart button.Machine will reboot in normal mode.

39. After reboot login with domain admin account.This is how the forest restored.

40. Need to follow the same process to restore the Child domains.