How to install SSL certificate on the Windows Server.

Login to your server with the Username and Password.

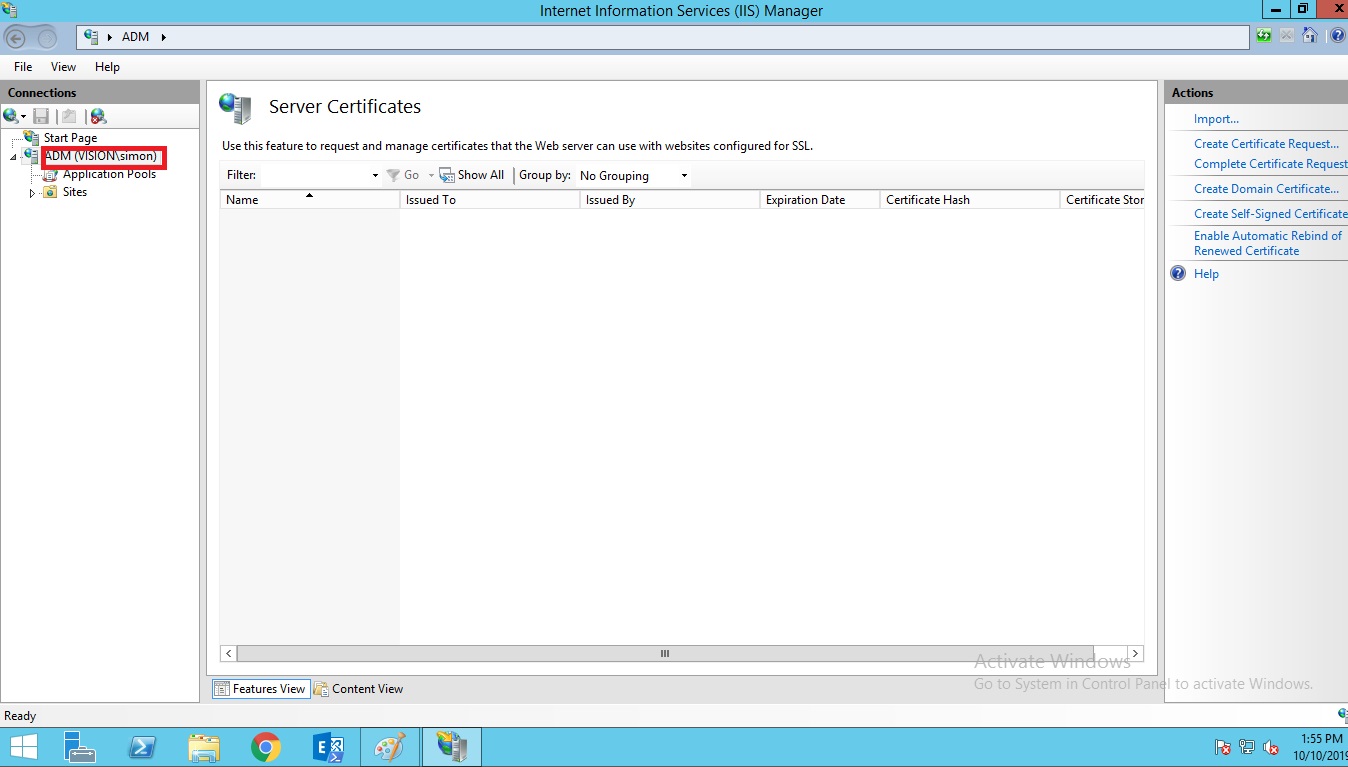
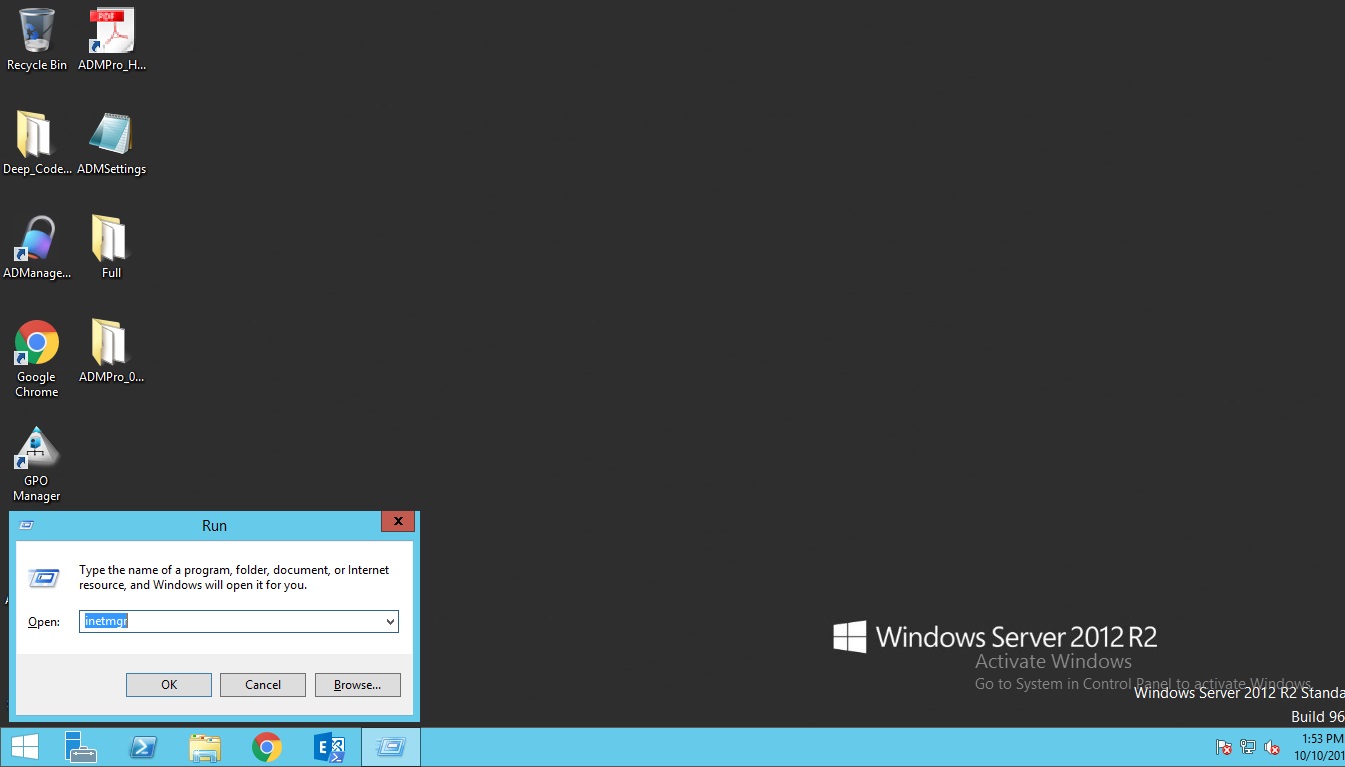
Press Win + R key type inetmgr –> Enter

Select the Server name in the left window pane.

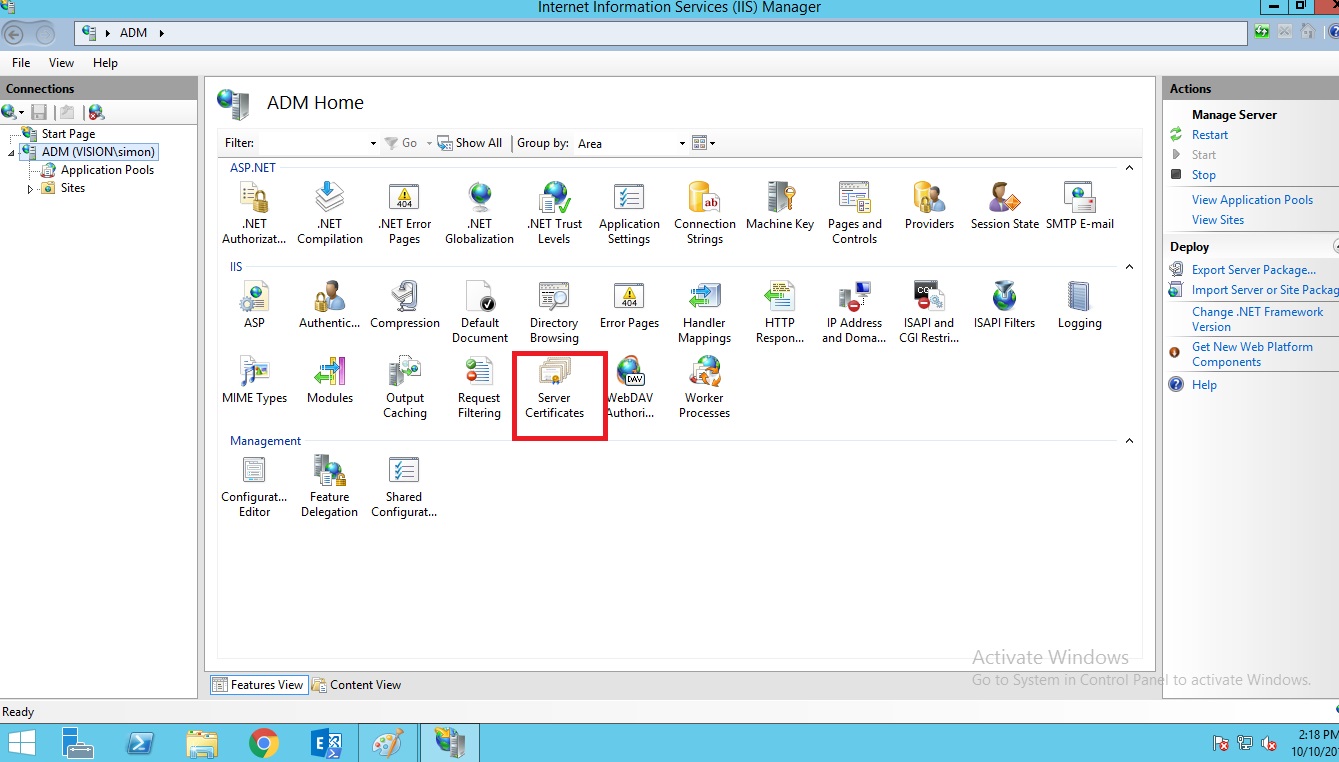
Double click on Server Certificates in the right window pane.

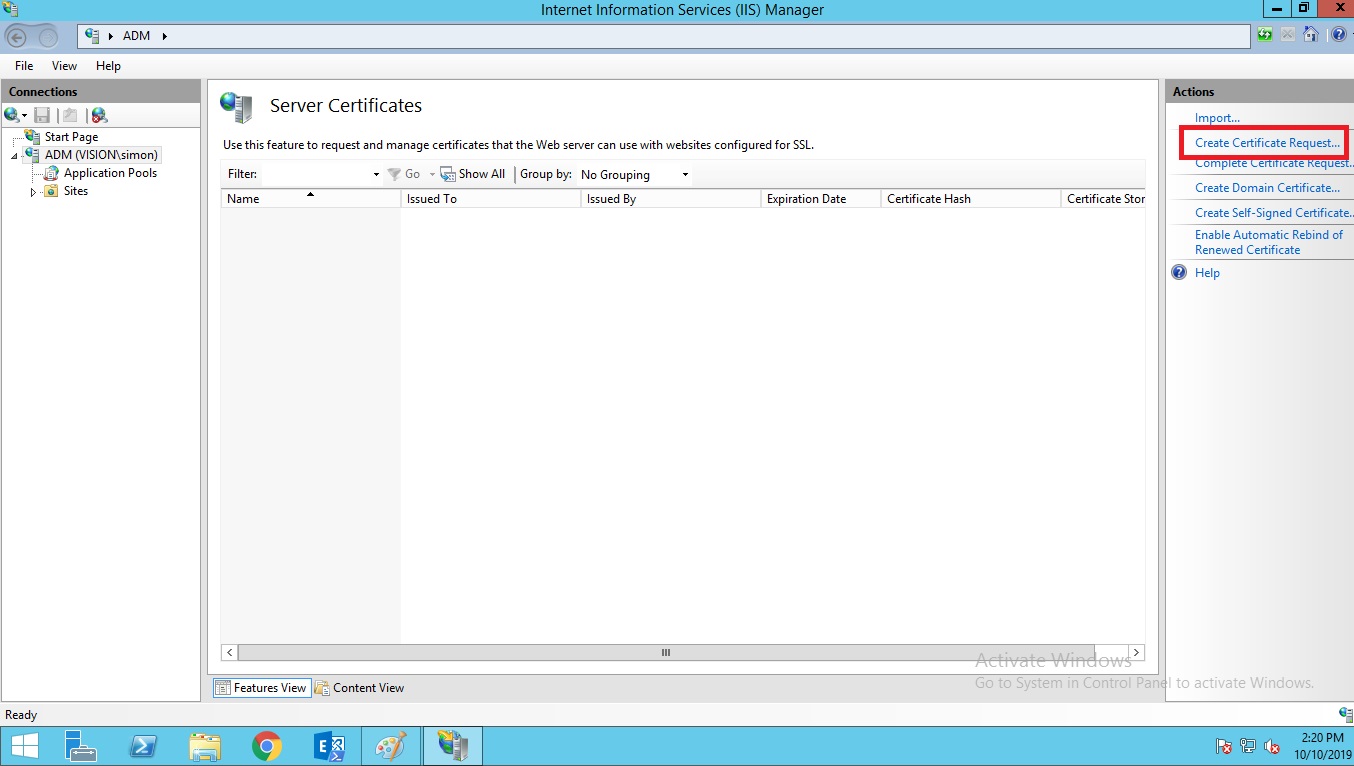
Click on Certificate Service Request.

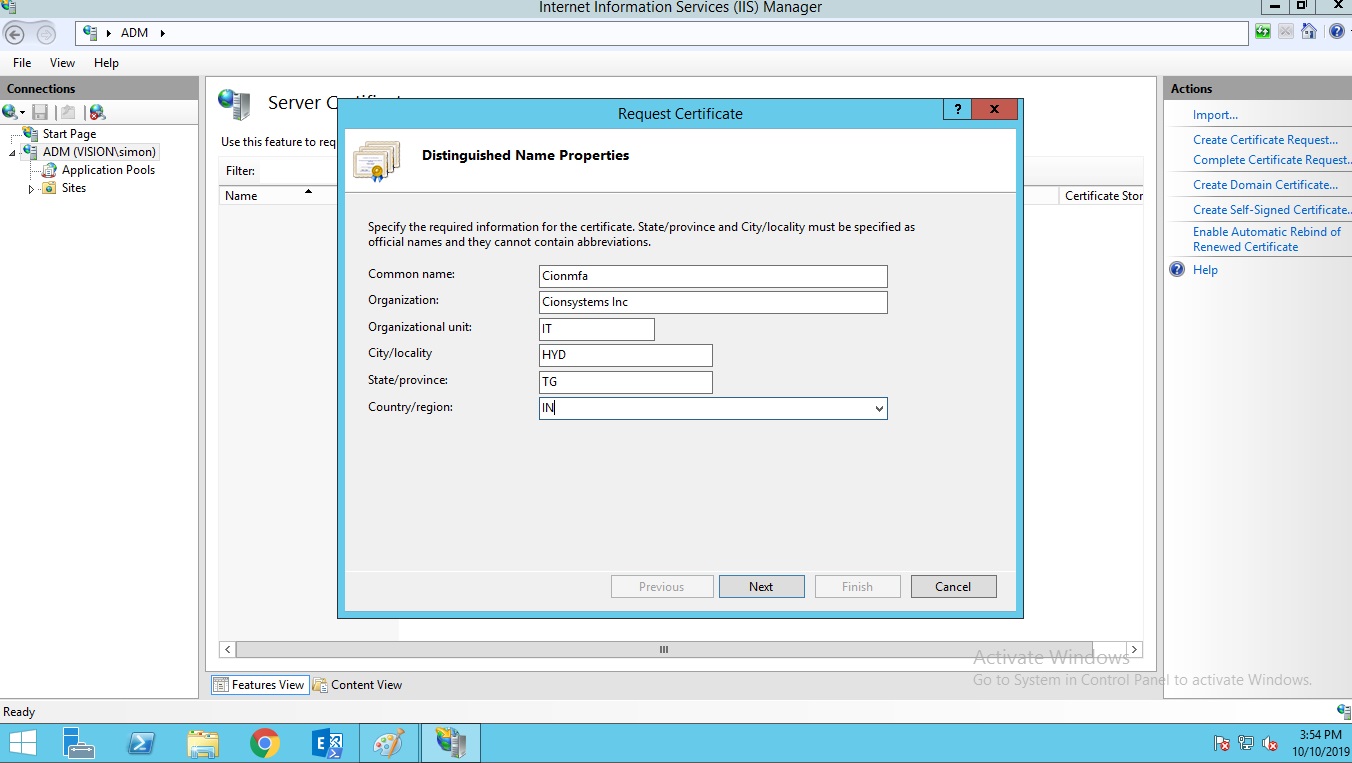
Fill the details in the request certificate. Click on Next

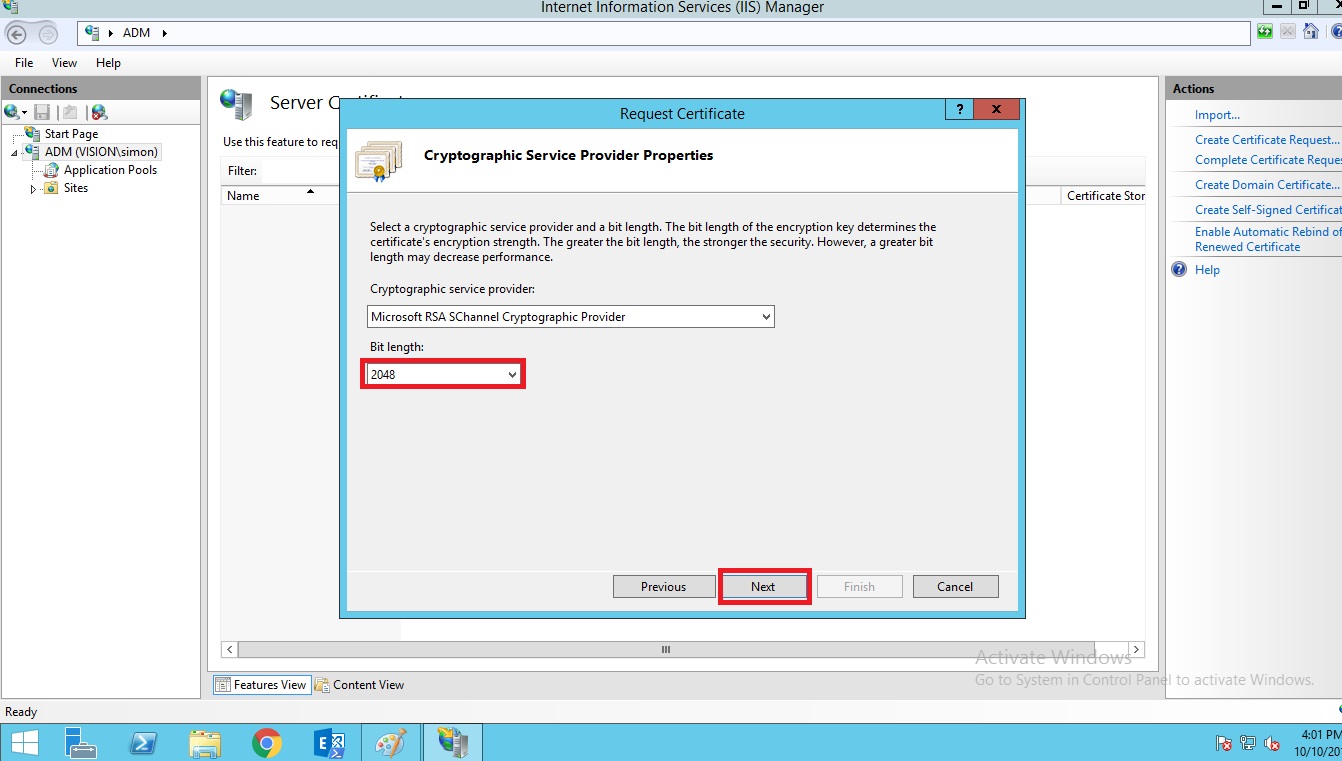
Select the bit length 2048 and click on next.

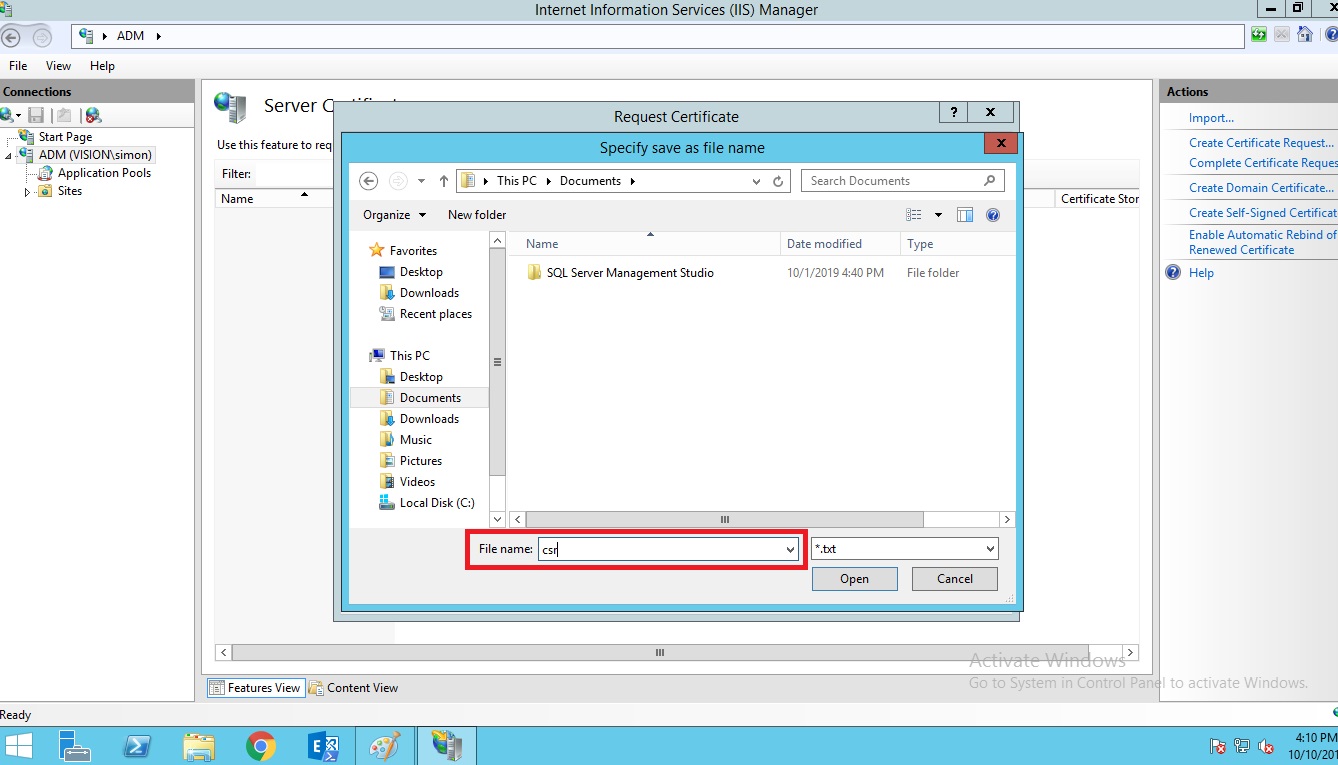
Browse the location where you to want to store certificate service request.

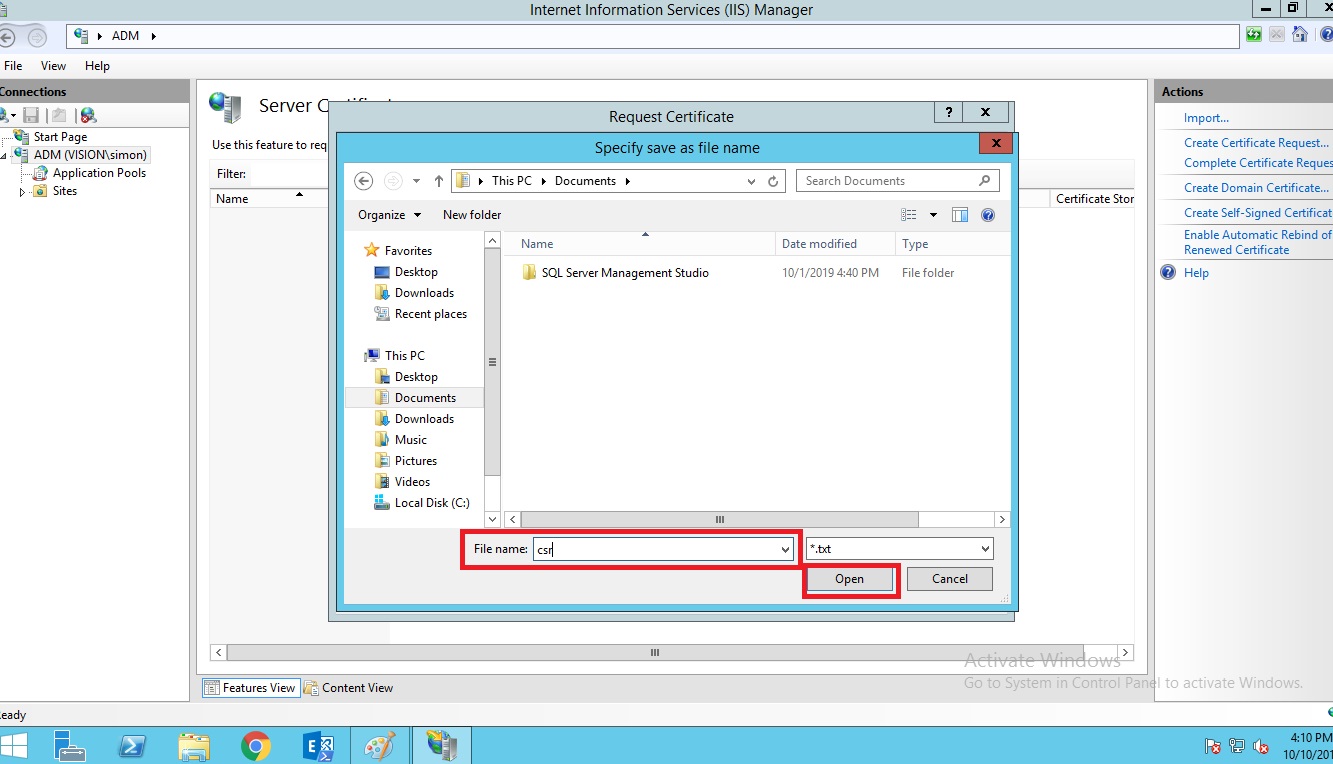
And give the file name and click on save button.

This completes the generation of certificate service request.

Login to your go daddy account with your username and password.

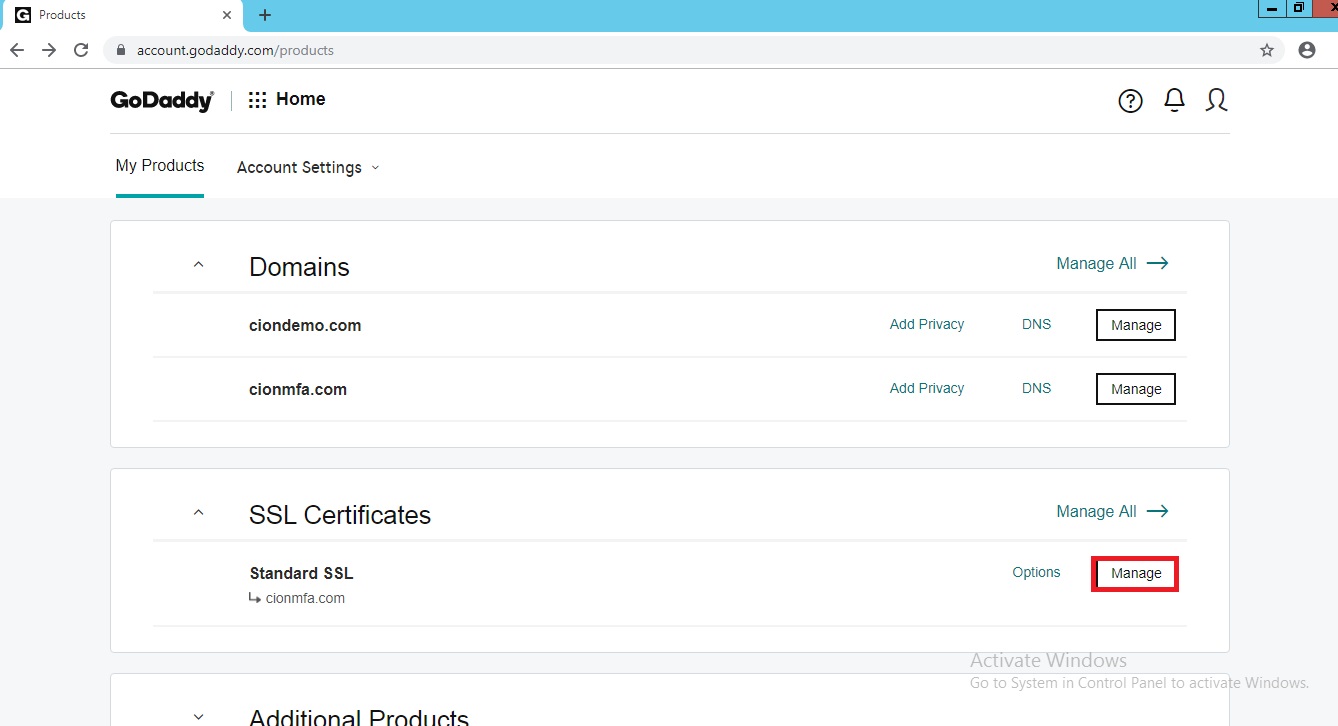
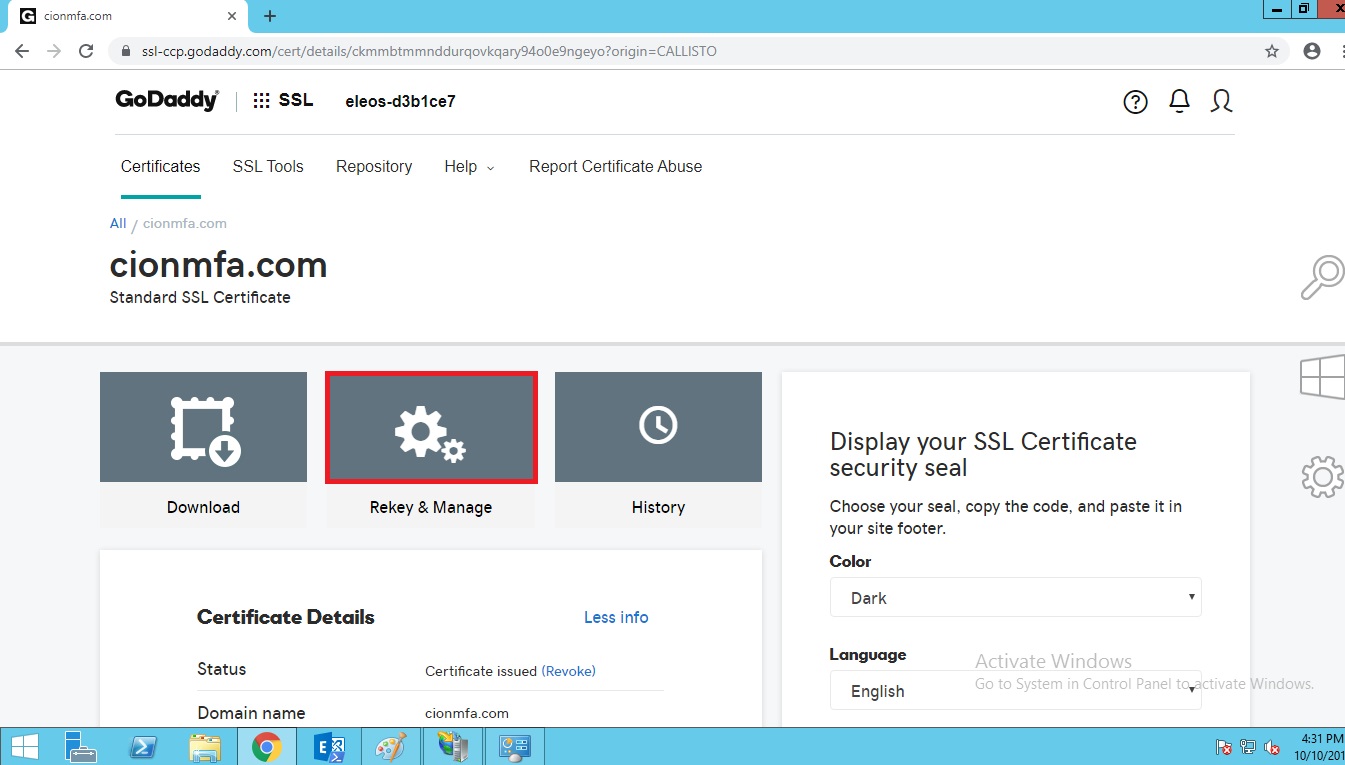
Under SSL click on manage. Click on rekey and manage.

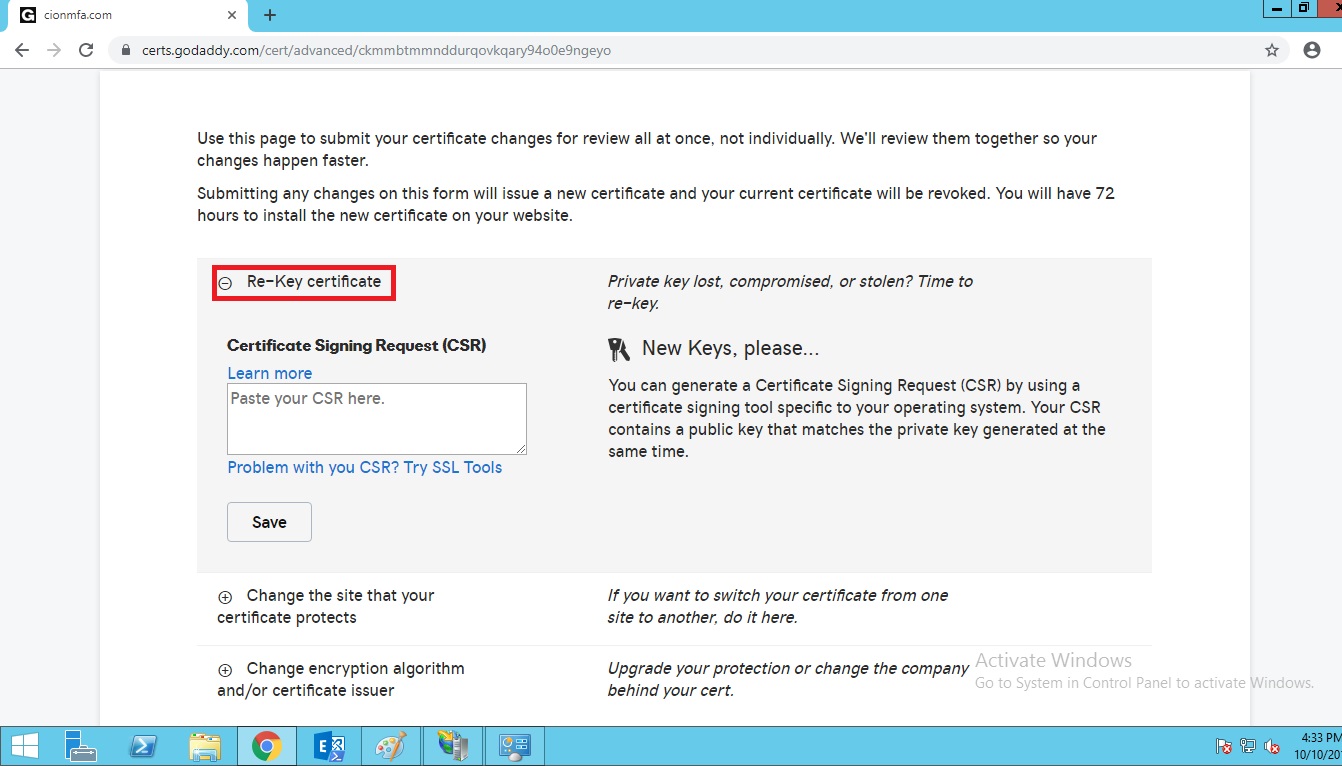
Click on rekey certificate.

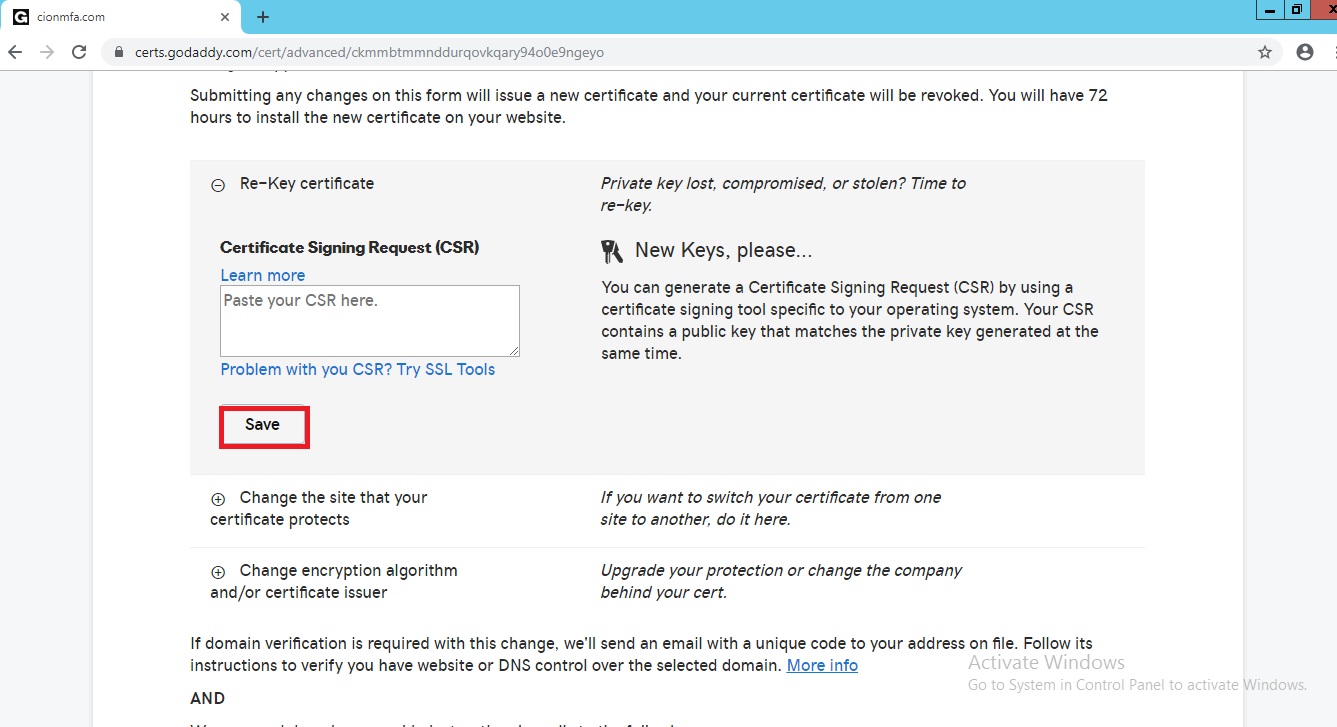
Open the certificate service request in notepad copy the whole thing from starting to end and paste it under CSR box and click on save button.

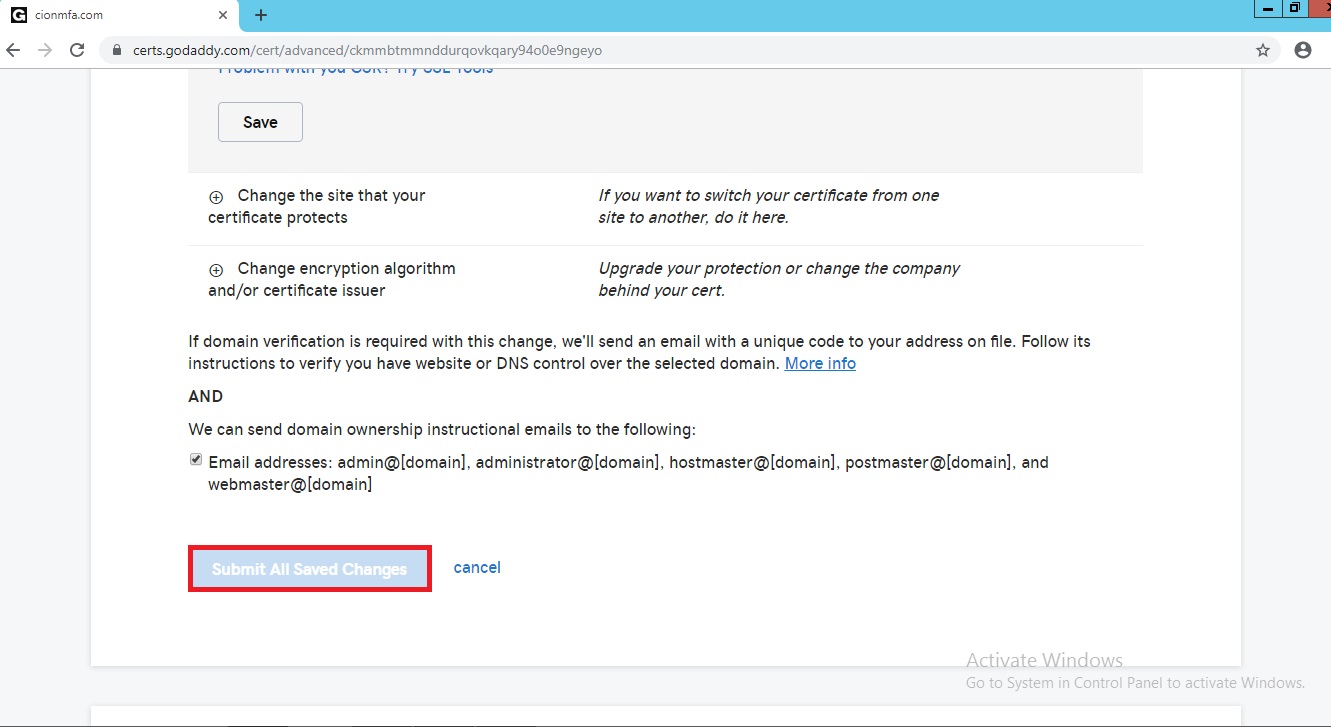
After that click on submit all saved changes.

After that you will receive SSL through your registered email ID within 5-10 minutes.

Manually Install an SSL Certificate.

After your certificate request is approved, you can download the certificate from the SSL manager and install it on your IIS 8 server.

Add a Certificate Snap-in to the Microsoft Management Console (MMC)

  1. Click on your Start Menu, then click Run.
  2. In the prompt, type mmc and click OK.
  3. Click File, and then click Add/Remove Snap-in.
  4. On the new window, click the Add button.
  5. On the new window, select Certificates and click Add.
  6. Select Computer account for the snap-in and click Next.
  7. Click Local computer and click Finish.
  8. Click Close on the Add Standalone Snap-in window.
  9. Click OK on the Add/Remove Snap-in window.

Import the Intermediate SSL Certificate.

11.  In the MCC Console, click  to expand Certificates (Local Computer).

12.  Right click on the Intermediate Certification Authorities folder, hover over All Tasks and click Import.

13.  On the new window, click Next.

14.  Click Browse, find your previously uploaded intermediate certificate file and click Open.

15.  Click Next, verify that the certificate information is proper and click Finish.

16.  Close the the import was successful notification.

Install your SSL certificate

  1. Click on your Start Menu, then click Run.
  2. In the prompt, type inetmgr and click OK to launch the Internet Information Services (IIS) Manager.
  3. Under the Connections panel on the left, click on your Server Name.
  4. In the main panel under the IIS section, double click on Server Certificates.
  5. Under the Actions panel on the right, click Complete Certificate Request.
  6. On the new window, click  to browse, find your previously uploaded primary certificate file and click Open.
  7. Add a Friendly name to easily identify this certificate in the future.
  8. In the certificate store option, select Personal and click OK.

Bind the SSL certificate

  1. Under the Connections panel on the left, click  to expand the Sites folder.
  2. Click the Site Name that you plan to install the SSL certificate onto.
  3. Under the Actions panel on the right, find the Edit Site section and click Bindings.
  4. On the new window, click Add and fill out the following information:
    • Type: select https.
    • IP Address: select All Unassigned.
    • Port: type in 443.
    • Host name: leave this empty.
    • SSL Certificate: select your recently installed SSL.
  5. Click OK to confirm, then Close for the Site Bindings window.

Restart IIS

Under the Actions panel on the right, find the Manage Website section and click Restart.

<a href='http://blog.cionsystems.com/?p=1021'>Common SSL errors on Windows Server</a>
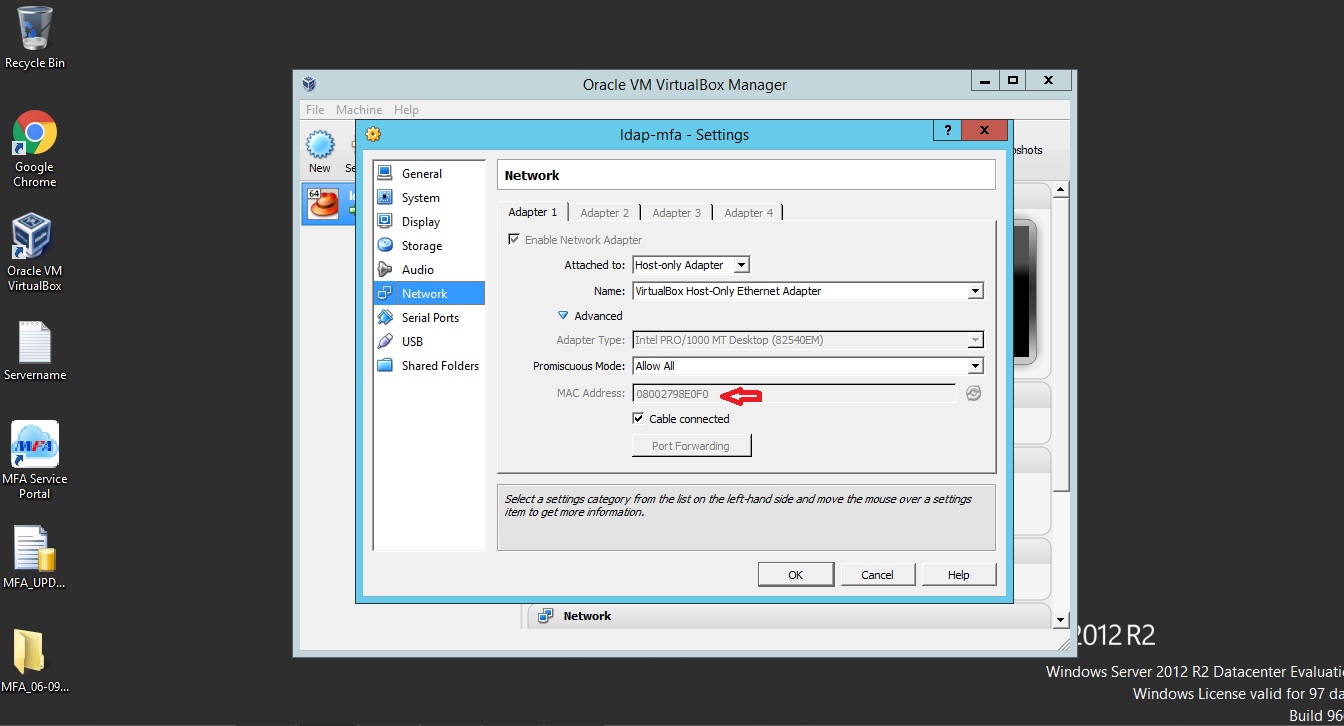
How to resolve “Device eth0 does not seem to be present,delaying initialization” error on Linux

Right click on the desktop —> Open in new terminal

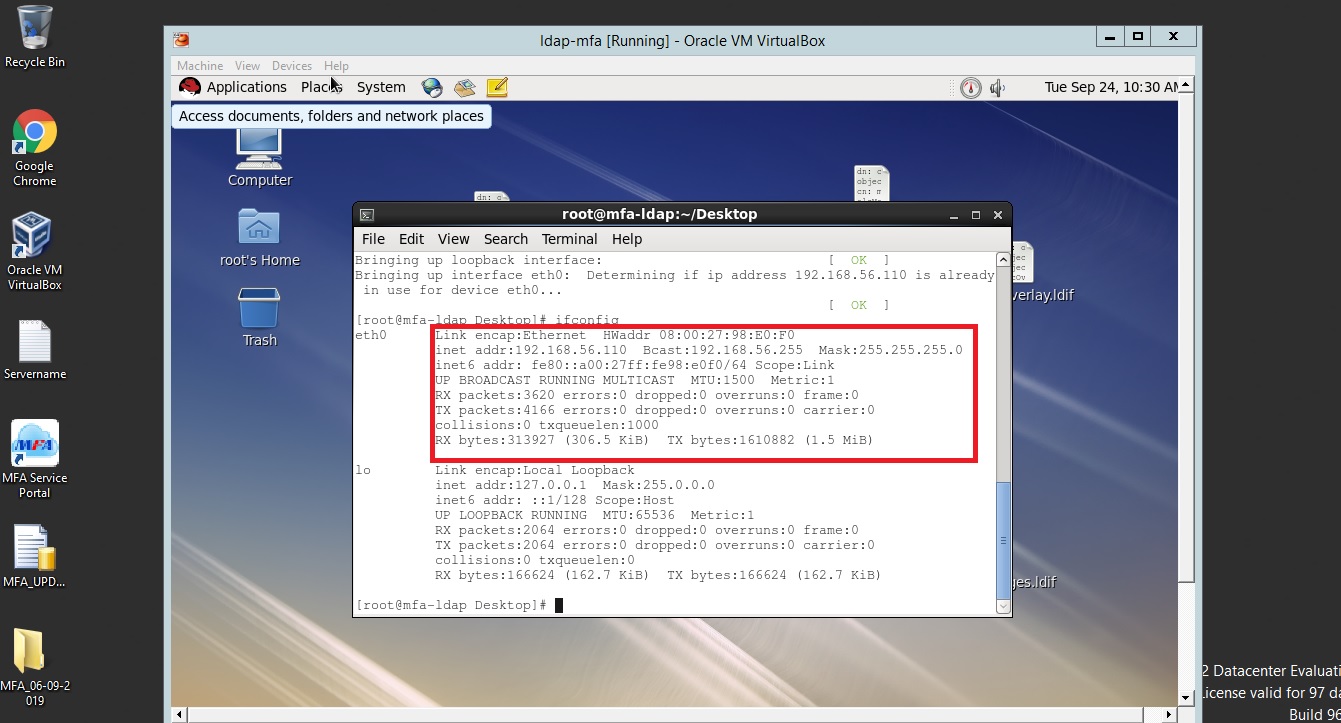
Type this command —> ifconfig

Sample Output:

lo Link encap: Local Loopback

inet addr: 127.0.0.1 Mask:255.0.0.0

inet6 addr: ::1/128 Scope:Host

UP LOOPBACK RUNNING MTU: 65536 Metric:1

RX packets: 0 errors:0 dropped: 0 overruns:0 frame:0

TX packets: 0 errors: 0 dropped: 0 overruns: 0 carrier:0

Collisions: 0 txqueuelen: 0

RX bytes: 0 (0.0 b) TX bytes: 0 (0.0 b)

Type this command on the terminal:

vi /etc/sysconfig/network-scripts/ifcfg-eth0

Sample Output:

DEVICE=eth0

BOOTPROTO=none

DEVICE=eth0

GATEWAY=192.168.1.1

HWADDR=08:00:27:DC:33:3F

IPADDR=192.168.56.110

NETMASK=255.255.255.0

NM_CONTROLLED=no

ONBOOT=yes

TYPE=Ethernet

USERCTL=no

To fix this problem, simply remove the file

/etc/udev/rules.d/70-persistent-net.rules and reboot the Linux machine.

Change the MAC address in this file ifcfg-eth0 and save the file. Reboot the machine.

To start the service networks type the below command

# service network restart (it will restart the network service)

# type this command  # ifconfig (displays the IP address)

This is how we can resolve the eth0 network related issue on Linux virtual machine.

How to Enable Audit settings to get notification from ADCN with GPO manager and microsoft tool!

With GPO Manager

1. To get Audit Notifications we have to create a GPO with some settings as below

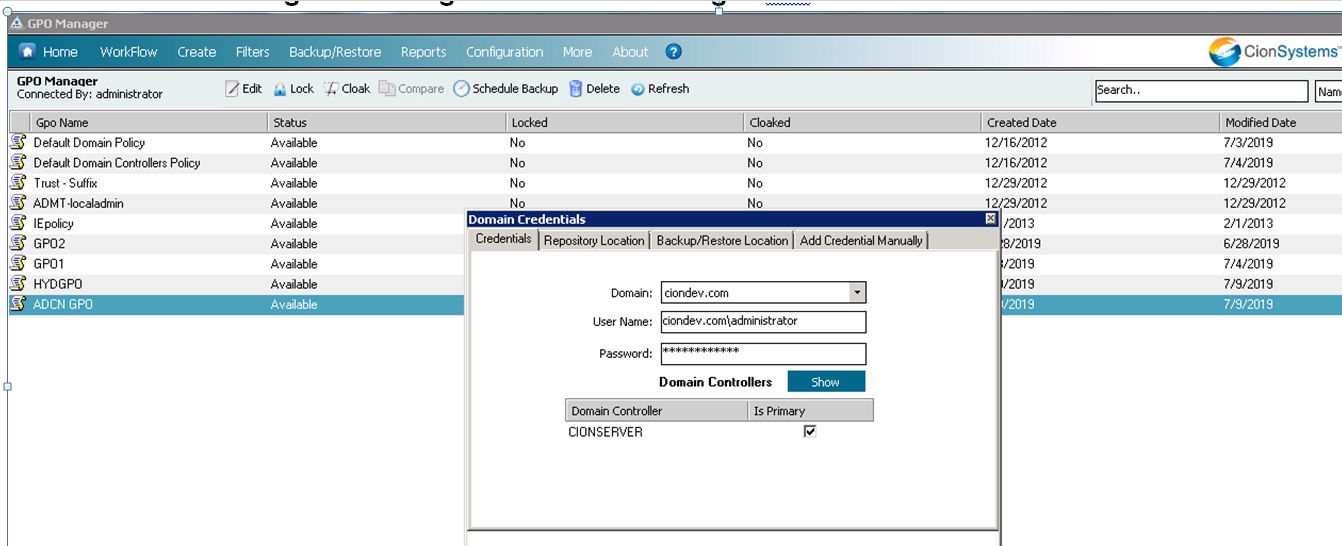
2. Go to GPO Manager and Login into GPO Manager with Admin User credentials as

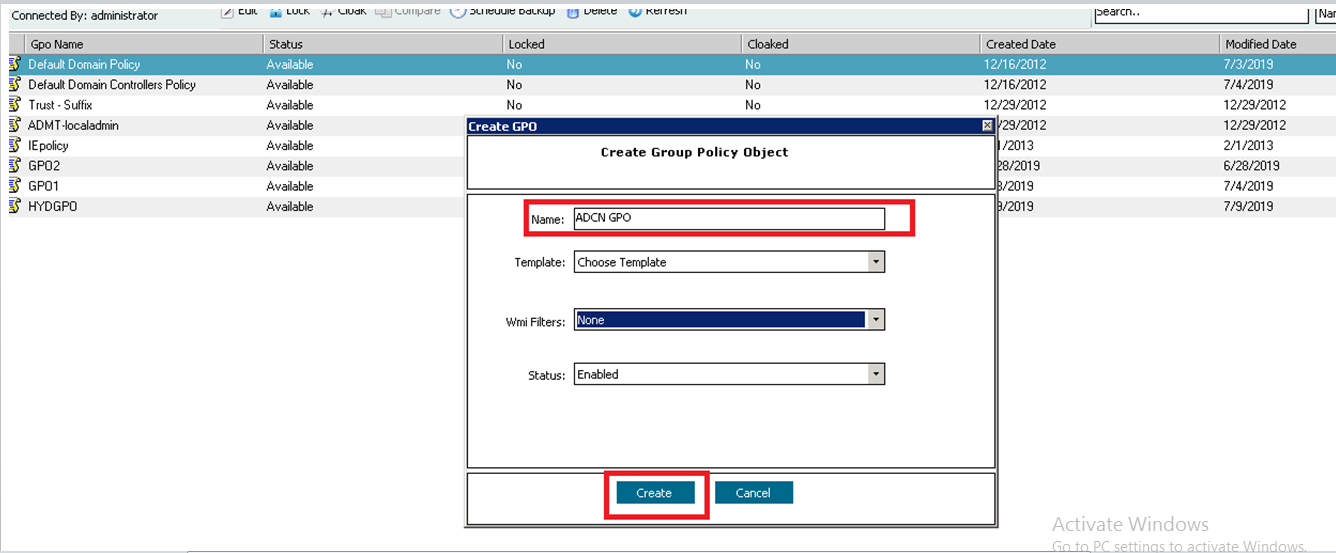
3. After Login into GPO Manager Click on Create –>Create GPO Option and Enter GPO name and Click on Create button

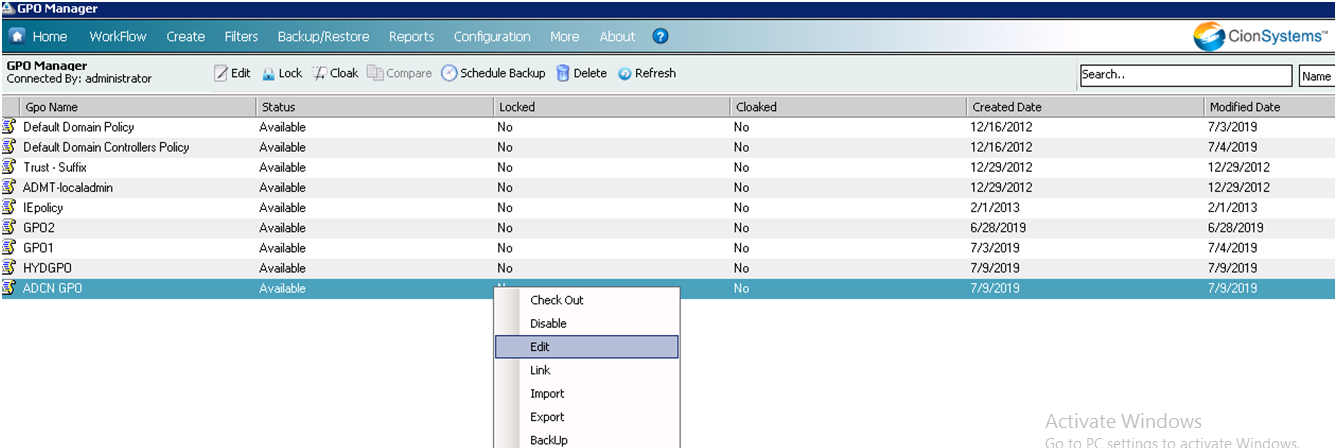
4. After creation of GPO right click on GPO and click on Edit option

5. Once GPO edit page opens  configure the policy as below

Configuration  of “Audit Policy”

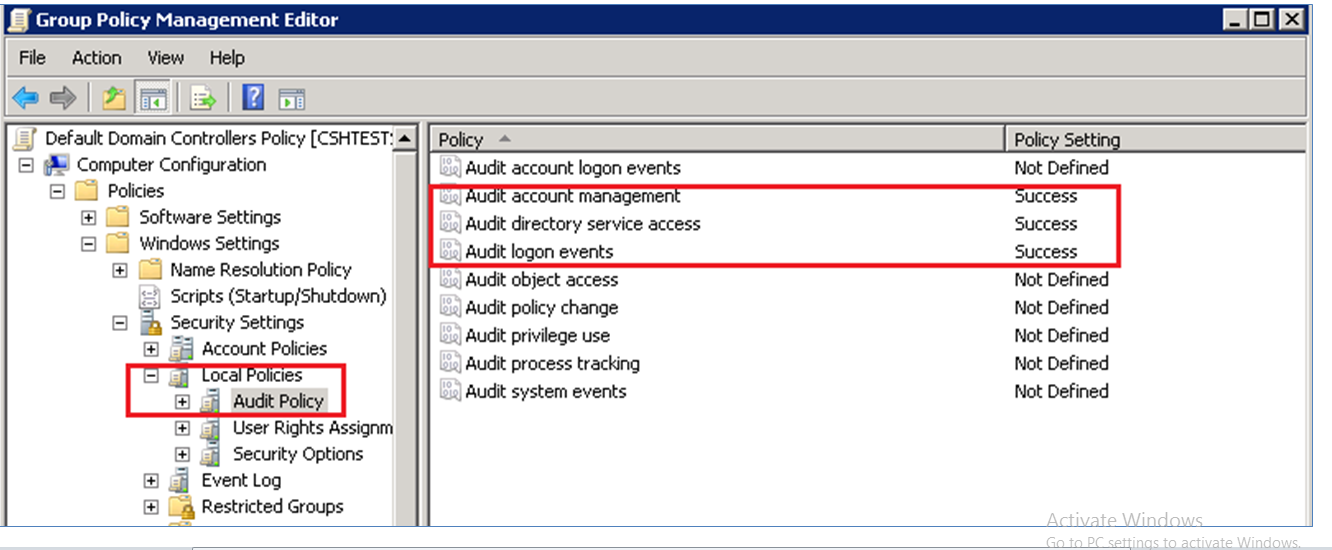
6. Navigate to the node Audit Policy (Computer Configuration Policies–>Windows Settings–>Security Settings–>Local Policies–>Audit Policy). Refer the below image.

  • In the right pane, right-click Audit account management, and then click Properties.
  • Click Define These Policy Settings, and then click to select Success or both Success and Failure check boxes:

Success: Success audits generate an audit entry when any account management event succeeds.

Failure: Failure audits generate an audit entry when any account management event fails.

Click on Apply–>click on OK button

Similarly configure “Audit directory service access” and “Audit logon events

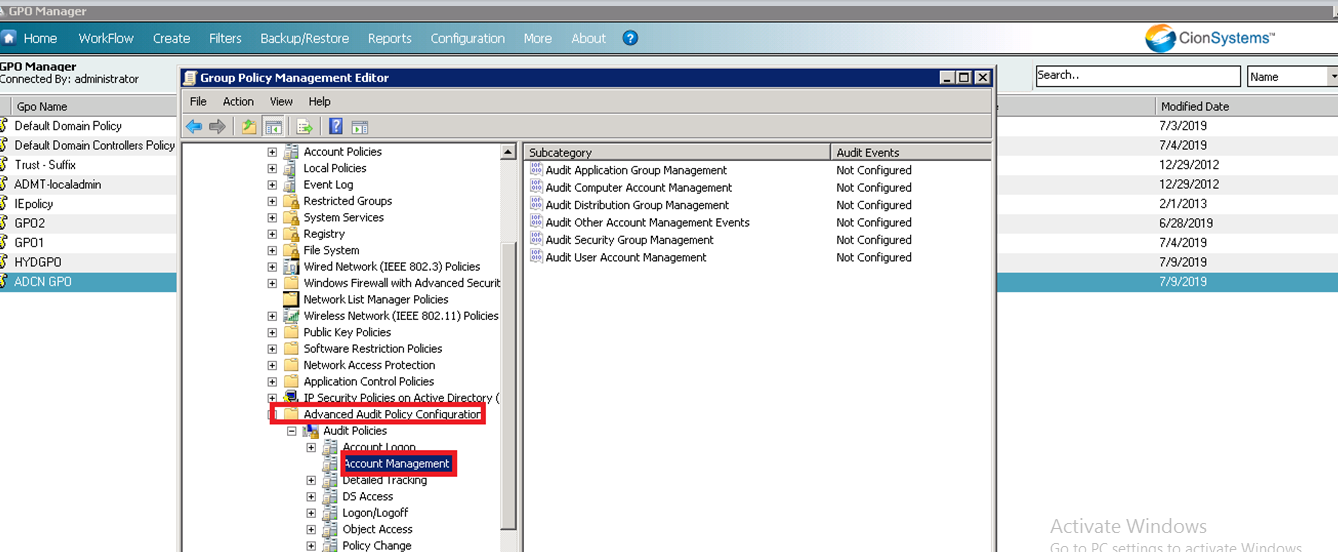
7. Now Go to Advance Audit policy Configuration –>Audit Policies –>Account Management

8. Select Options as  Audit Distribution group Management, Audit Security group Management and Audit User Account Management properties values as Success as shown below

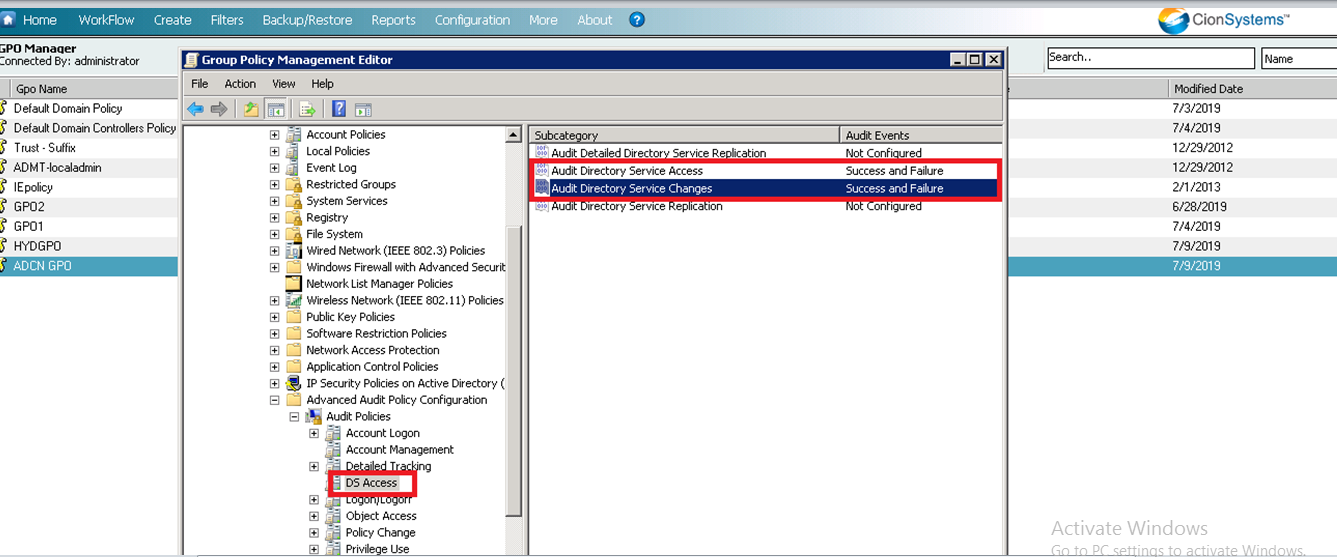
9. Now Go to Computer Configuration Policies Windows Settings Security Settings Advanced audit policy configuration Audit Policies.

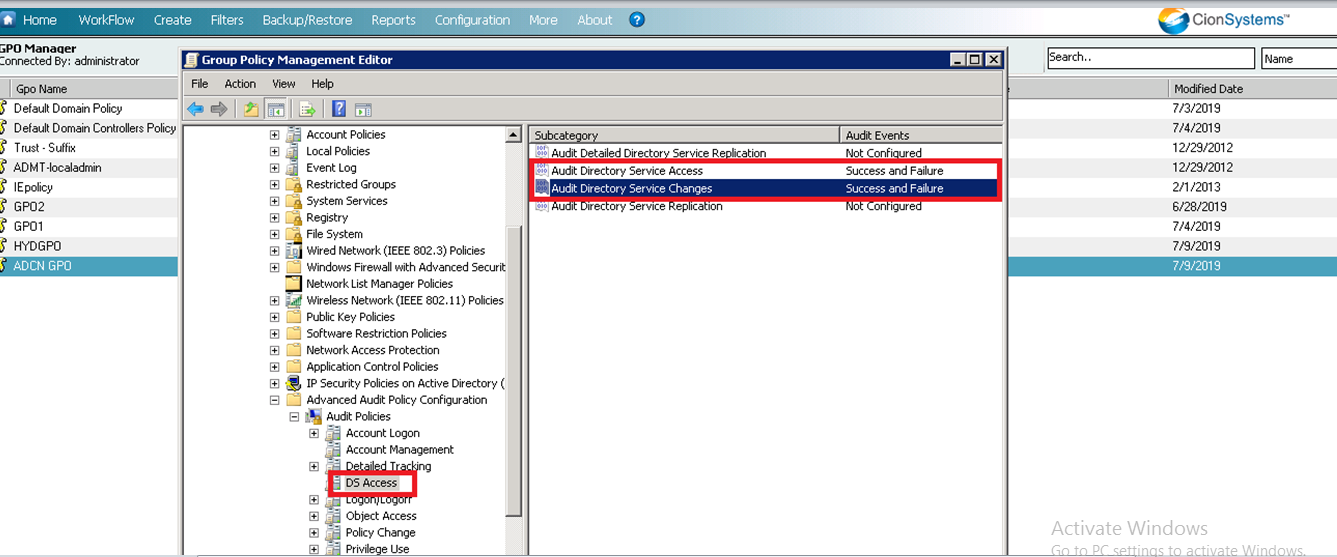
Click “DS Access” node to list all of its policies in the right panel

10. Double-click “Audit Directory Service access” policy to access its properties.

11. Configure it for both “Success” and “Failure” audit events.

12. Similarly, enable “Audit Directory Service Changes” by configuring it for both “Success” and “Failure” audit events.

13. Close “Group Policy Management Editor” window. It takes you back to “GPO Manager home page”

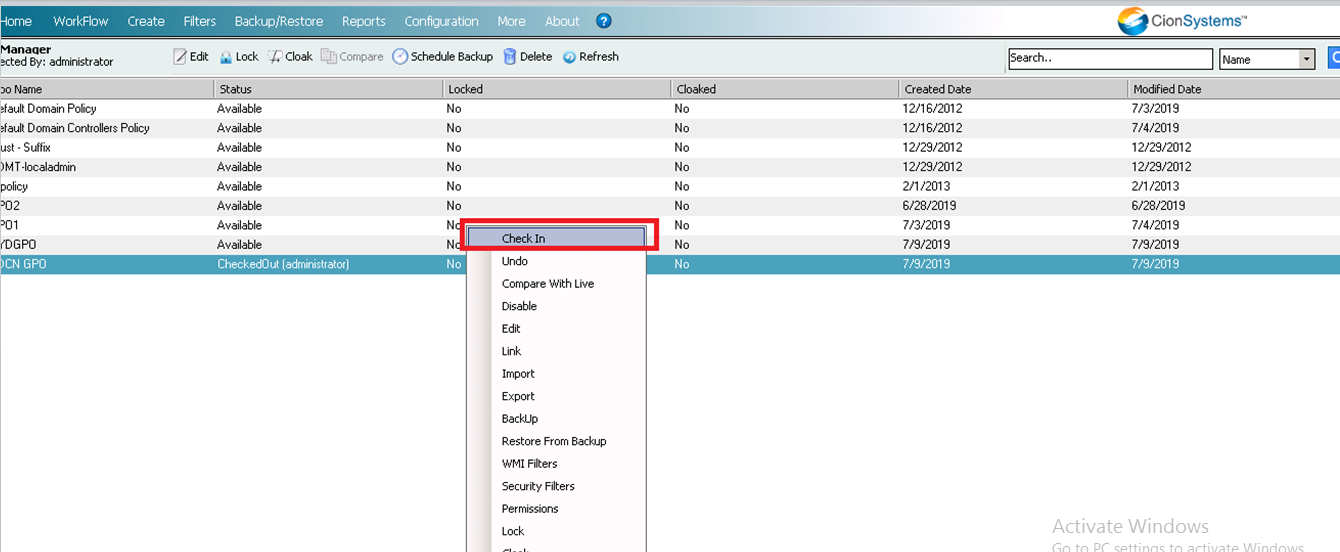
14. Now right click on the gpo and click on check in option.

15. Enter the comments and click on submit button it will show the message as check in completed.

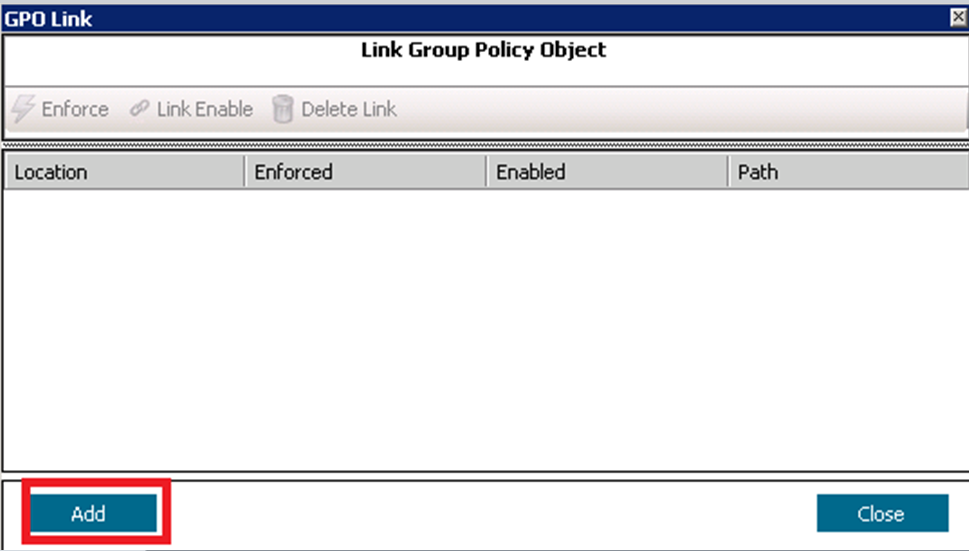
16. Now right click on gpo and click on link option it will pop ups a window as below.

17.Click on add button and select Domain controllers OU as shown below and click Ok button.

18.It will shows the alert message as gpo linked successfully then close the window

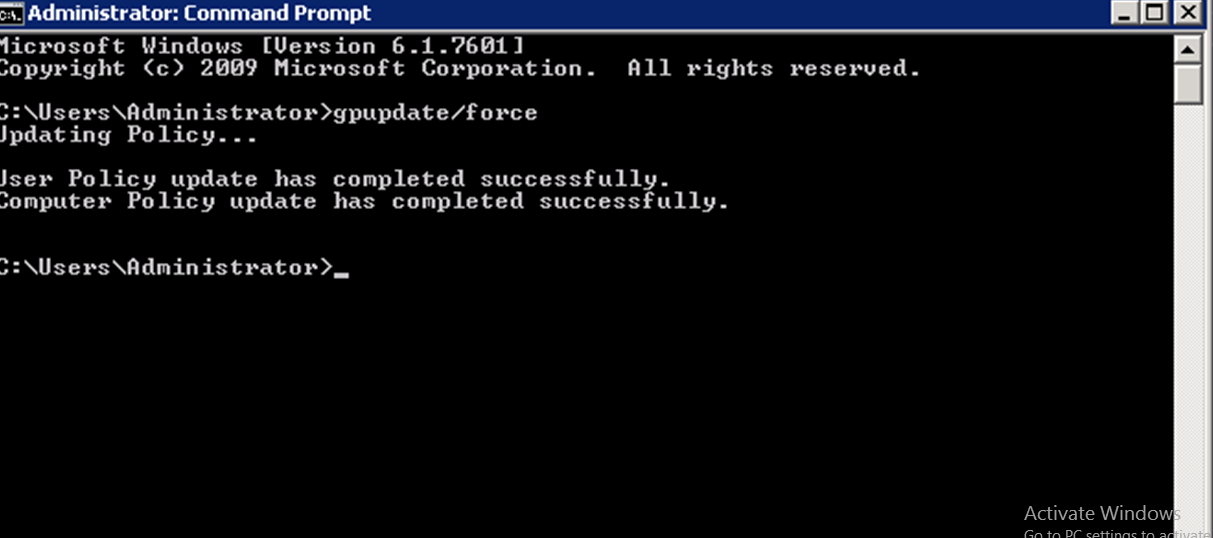
19. Now run the command “gpupdate/force “ in command prompt as shown below.

20. Once updates complete Go to Start –> Administrative tools –> ADSI Edit

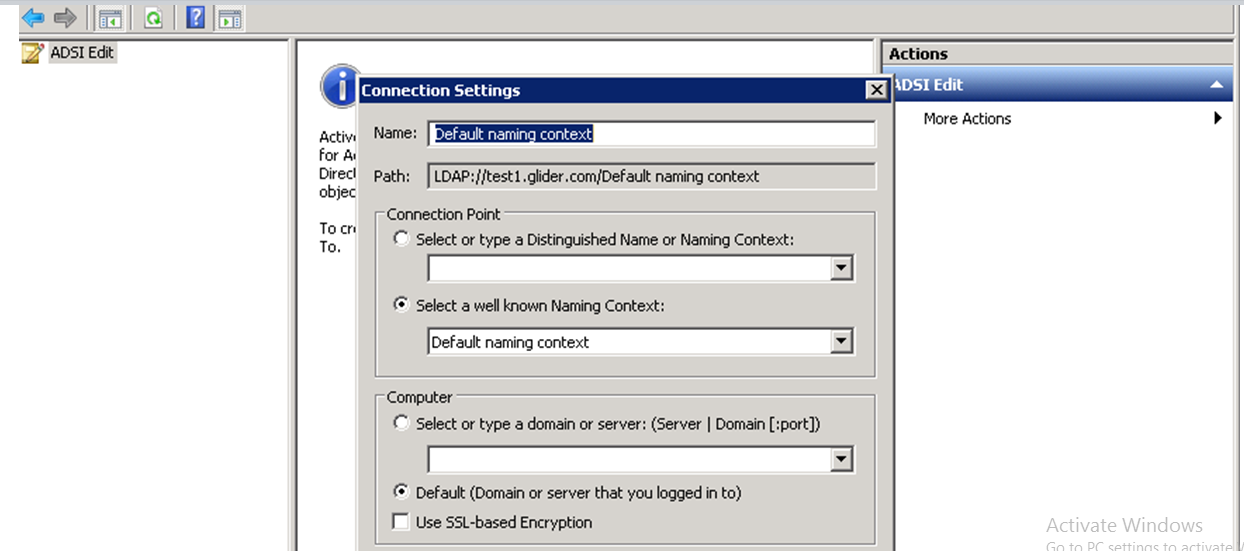
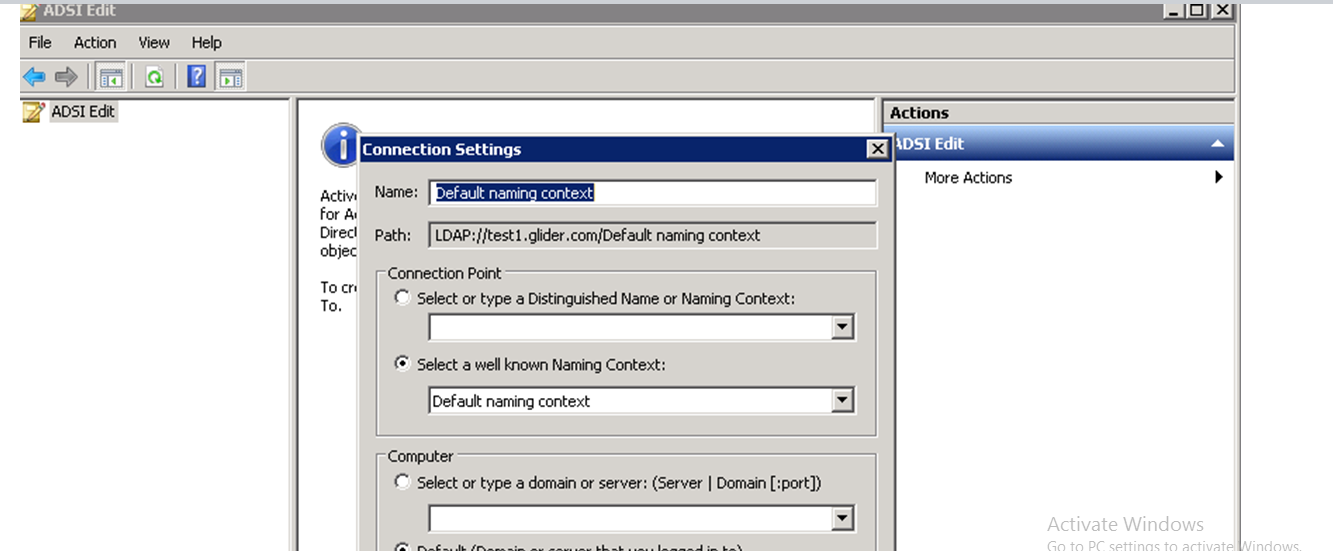
21. Right Click on ADSI Edit Select Connect to Option and Select Default Naming context option and click on Ok

22. Double-click the root node “Default Naming Context” to expand and access its sub-nodes.

23.Right-click the top node titled “DC=domain, DC=com” and click “Properties”.

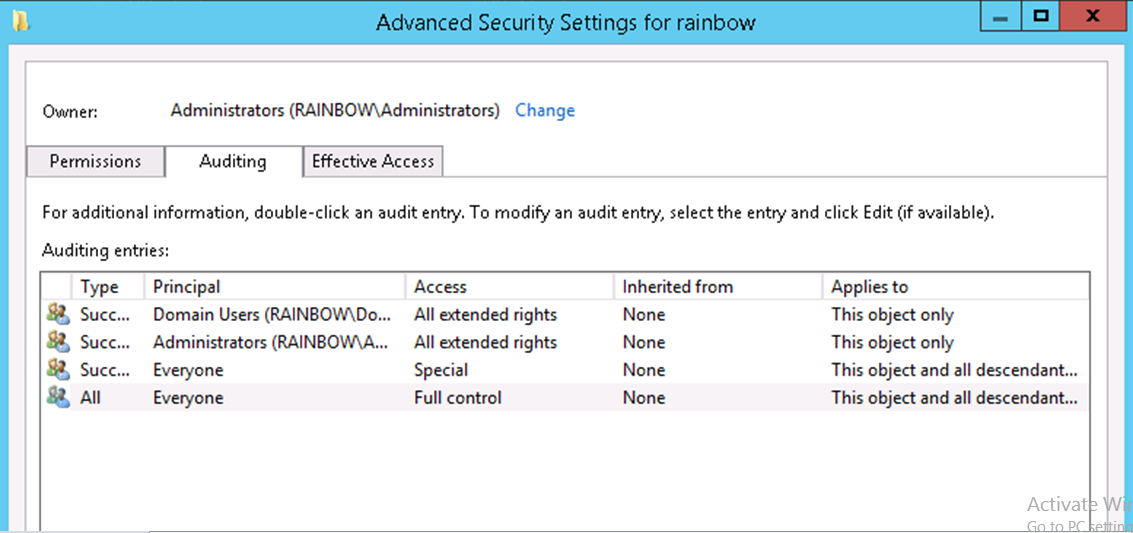
24.In “Properties”, switch to “Security” tab and click “Advanced” button to access “Advanced Security Settings for Domain”

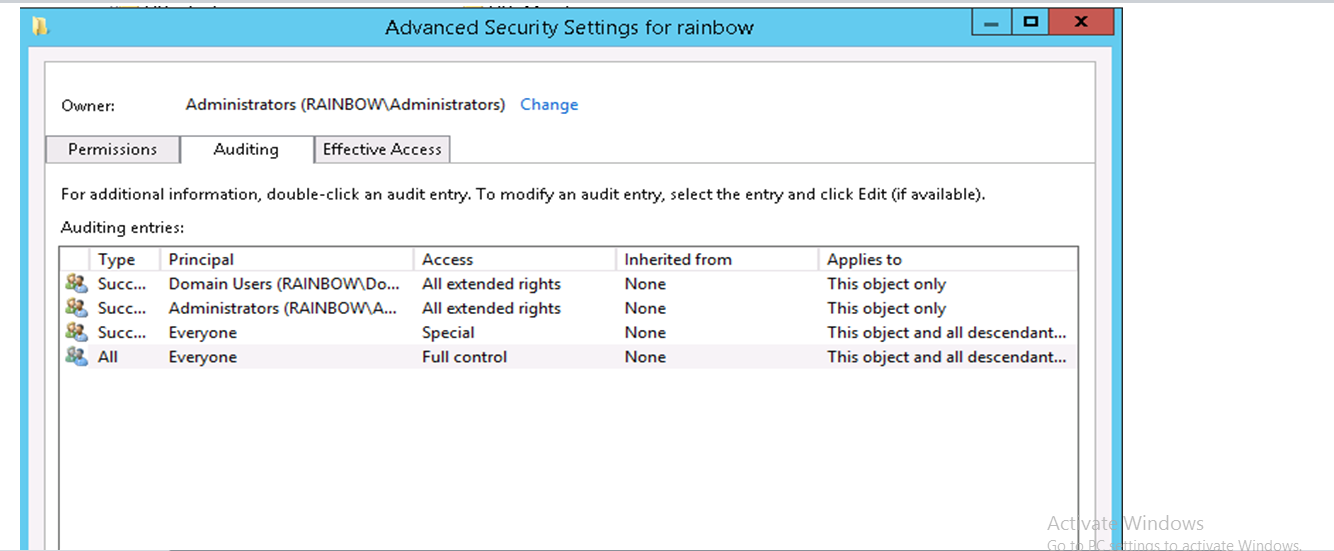
25. Switch to “Auditing” tab.


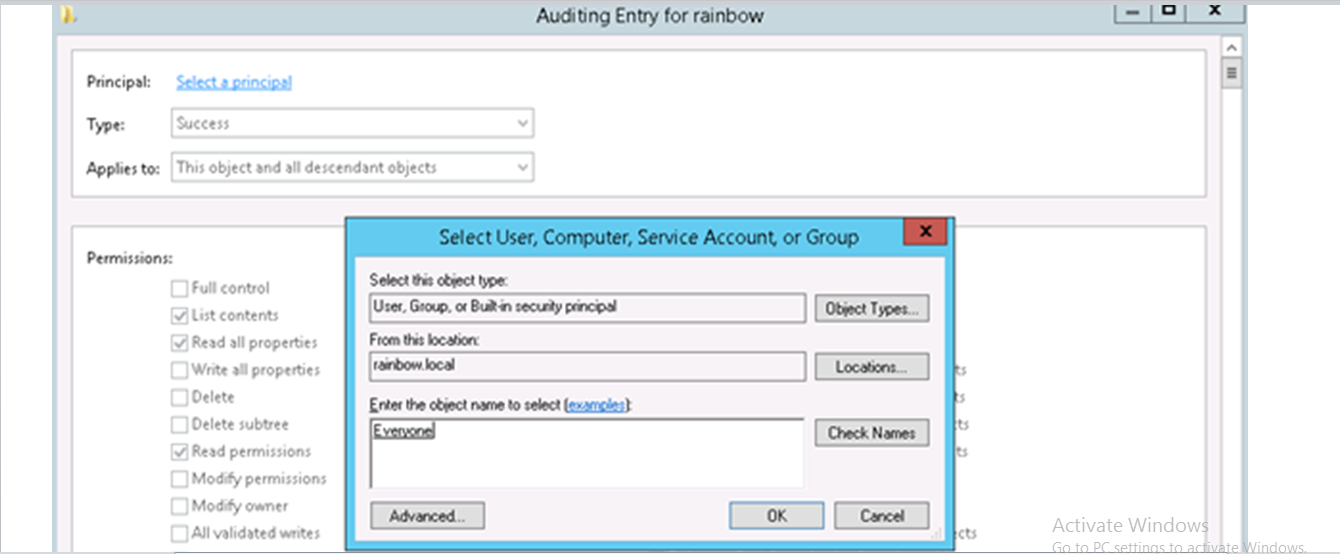
26. Click on Add button and click on select a Principle and Search for Every one option as shown below and click on OK

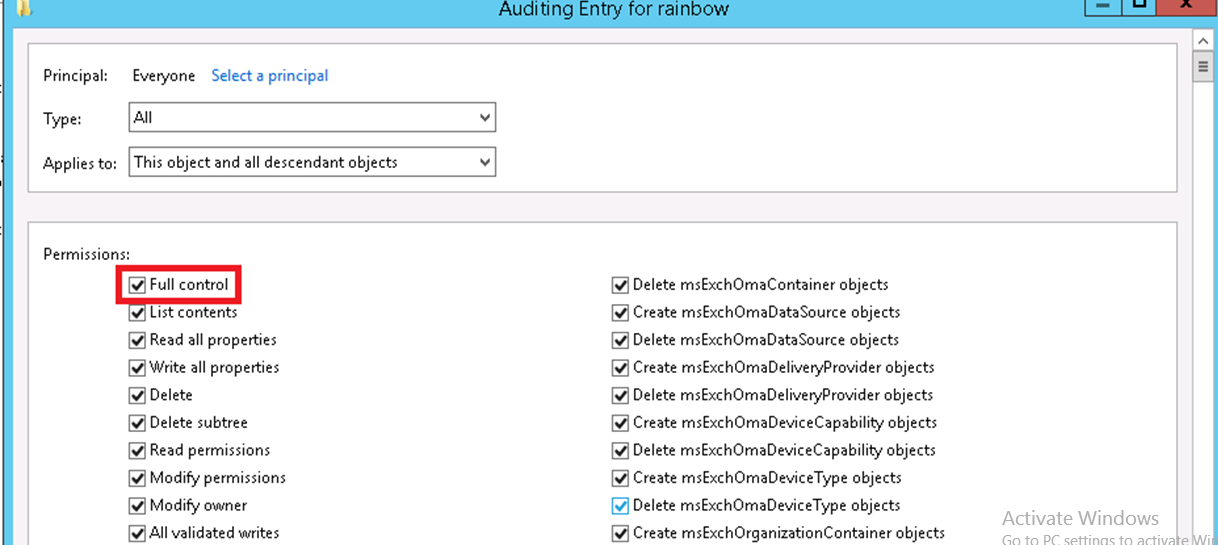
27. Now Select the Type and applies options as shown below in image and select full control Option

28. Click on ok button, Click on Apply and click ok

29. Click on ok button, Click on Apply and click ok

Enabling Audit Settings for ADCN (With Microsoft tool)

1. To get Audit Notifications we have to create a GPO with some settings as below

2. Go to Start –> Administrative tools –> Group Policy Management –>Open

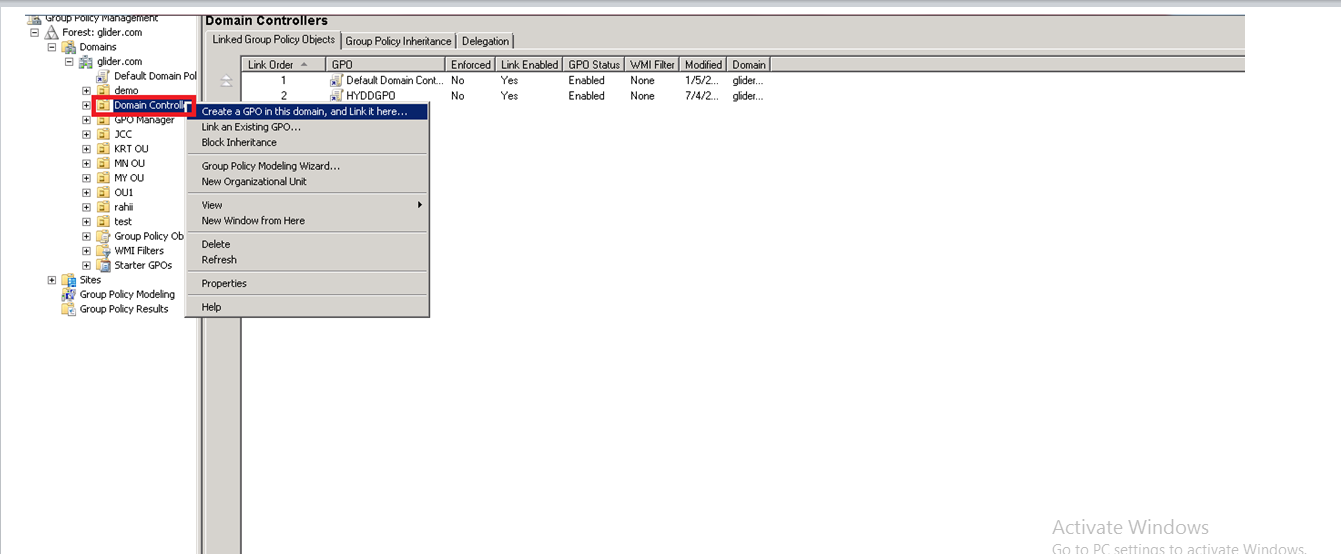
3. Right Click on Domain Controllers OU and Select Create a GPO in this domain, and Link it here as shown

4. Enter the Name of the GPO as required and create a new GPO.

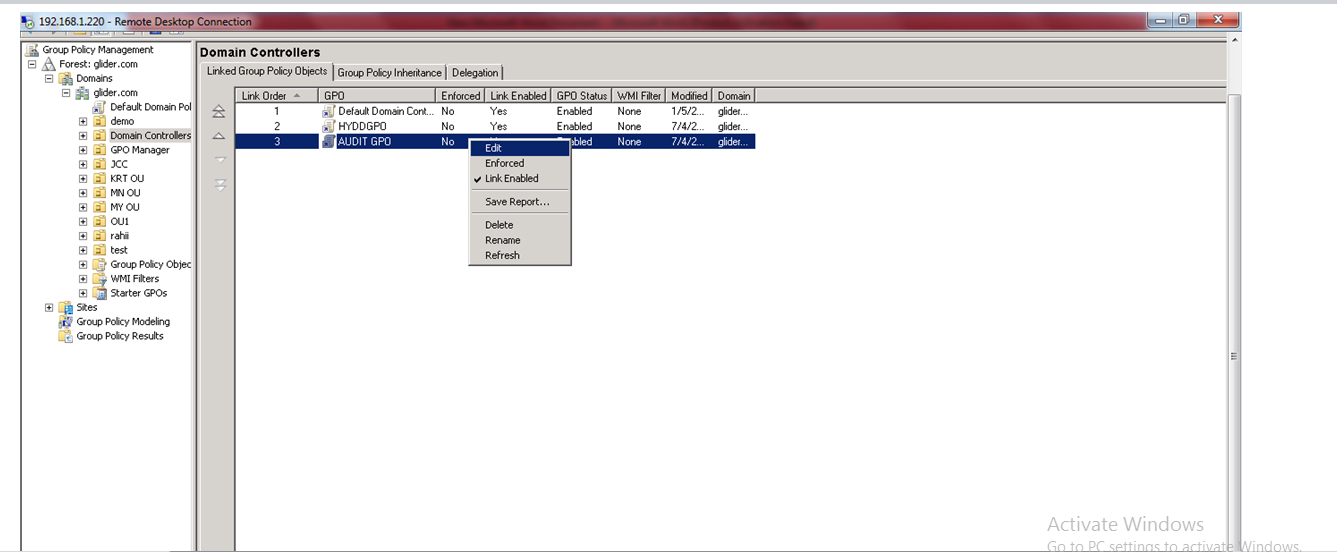
5. Select the created GPO and click on Edit option

Now configure the policy as below.

6. Navigate to the node Audit Policy (Computer Configuration–>Policies–>Windows Settings–>Security Settings–>Local Policies–>Audit Policy). Refer the below image.

  • In the right pane, right-click Audit account management, and then click Properties.
  • Click Define These Policy Settings, and then click to select Success or both Success and Failure check boxes:

Success: Success audits generate an audit entry when any account management event succeeds.

Failure: Failure audits generate an audit entry when any account management event fails.

  • Click on Apply–>click on OK button.

Similarly configure “Audit directory service access” and “Audit logon events

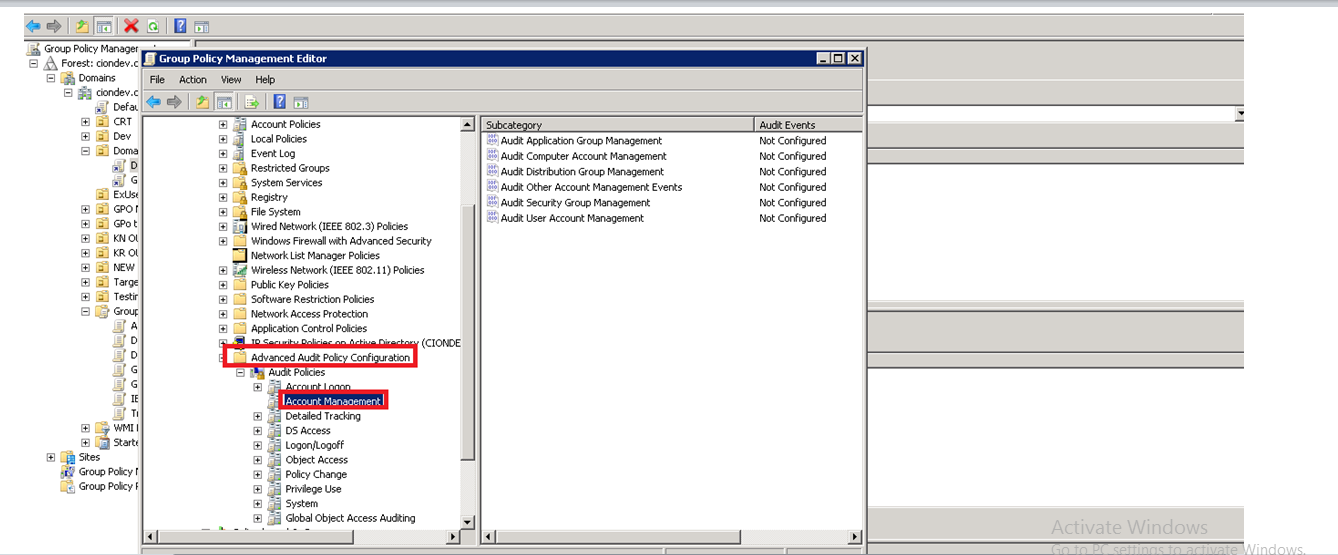
7. Now Go to Advance Audit policy Configuration –>Audit Policies –>Account Management

8. Select Options as  Audit Distribution group Management, Audit Security group Management and Audit User Account Management properties values as Success as shown below.

9. Now Go to Computer Configuration Policies Windows Settings Security Settings Advanced audit policy configuration” Audit Policies.

Click “DS Access” node to list all of its policies in the right panel.

10. Double-click “Audit Directory Service access” policy to access its properties.

11. Configure it for both “Success” and “Failure” audit events.

12. Similarly, enable “Audit Directory Service Changes” by configuring it for both “Success” and “Failure” audit events.

13. Close “Group Policy Management Editor” window. It takes you back to “Group Policy Management Console”.

14. Now run the command “gpupdate/force “ in command prompt as shown below.

15. Once updates complete Go to Start –> Administrative tools –> ADSI Edit

16. Right Click on ADSI Edit Select Connect to Option and Select Default Naming context option and click on Ok

17. Double-click the root node “Default Naming Context” to expand and access its sub-nodes.

18. Right-click the top node titled “DC=domain, DC=com” and click “Properties”.

19. In “Properties”, switch to “Security” tab and click “Advanced” button to access “Advanced Security Settings for Domain”

20. Switch to “Auditing” tab.

21. Click on Add button and click on select a Principle and Search for Every one option as shown  below And click on OK

22. Now Select the Type and applies options as shown below in image and select full control option.

23. Click on ok button, Click on Apply and click ok

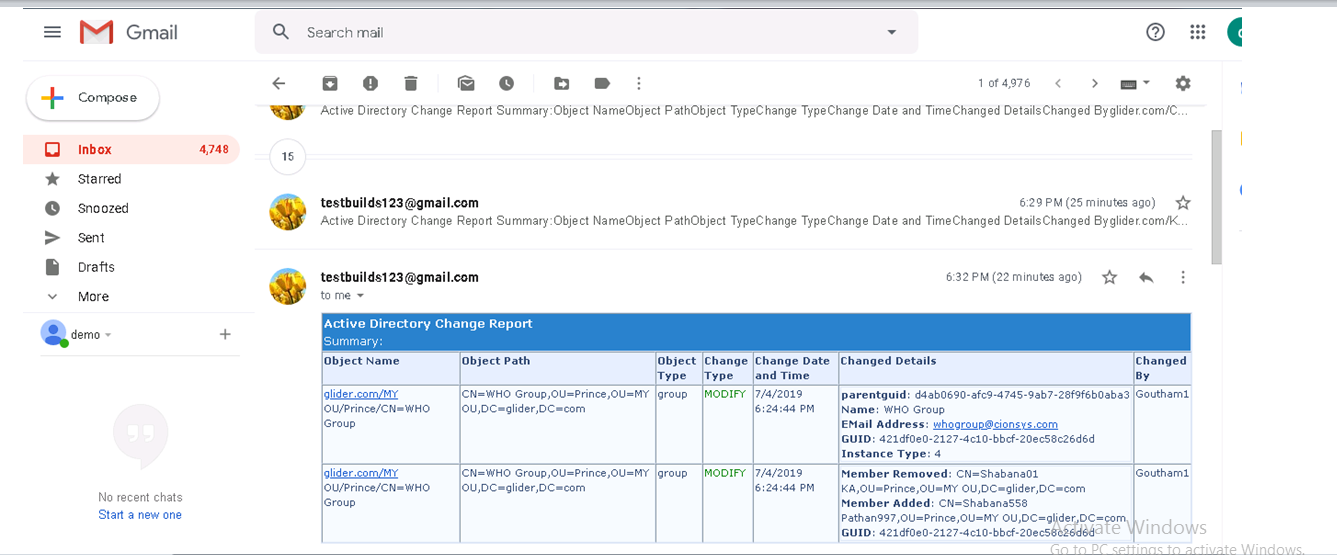
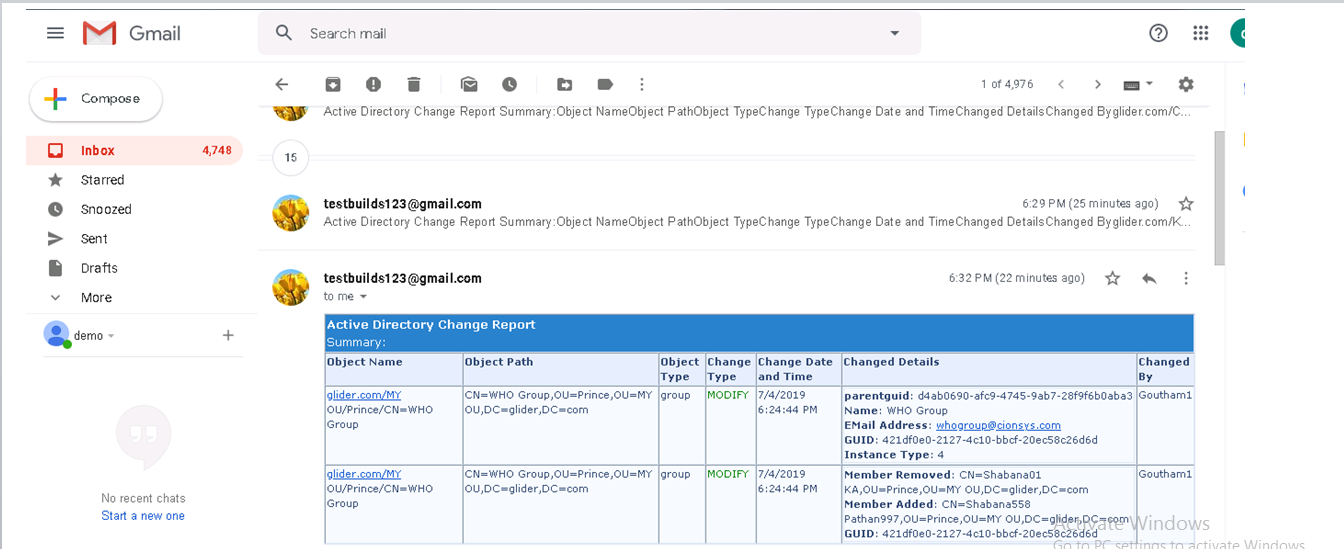
24. Once the above changes done we will receive the notifications of objects in mail as below.

The specified module ‘active directory’ was not loaded because no valid module file was found!

Term not recognized as the name of a cmdlet, function, script file, or operable program.

In Power Shell, modules are collections of cmdlets that extend Power Shell’s functionality.In most cases, the cmdlets contained within a module are related to a specific product or to a specific Windows role or feature.

Type this command Get-Module on power-shell window ( It will display list of the modules that are loaded).The Get-Module cmdlet shows you the names of each module, and the cmdlets that the module contains.

Get-VM cmdlet is native to Windows, even though the corresponding module is not loaded by default,it displays the names of the Hyper-V virtual machines that exist on the server.

Get-Module: It display the module type,Version,Name and Exported Commands.

For the above error we need to add the Window Features from Server Manager. Below are the screen capture Images how to configure.

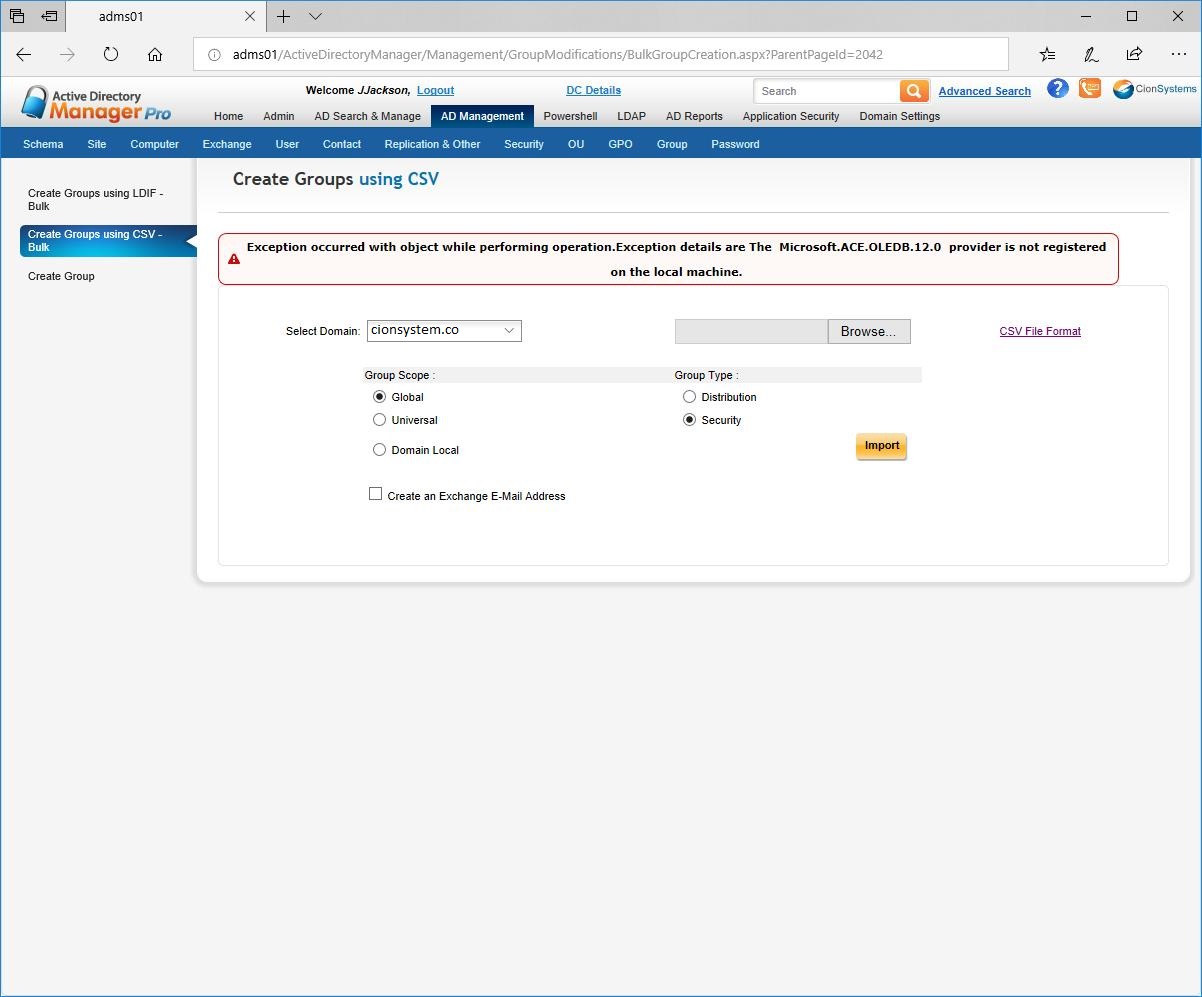
The Microsoft.ACE.OLEDB.12.0 provider is not registered on the local machine in Cionsystems Applications!

To resolve the error “The Microsoft.ACE.OLEDB.12.0 provider is not registered on the local machine” in Cionsystems  products or any .net web applications.

You will get this error while uploading the csv file during bulk creation.  It is because of non-existence of “Microsoft Access Database Engine 2013 (32 bit) on the server.

Resolution: On the Server having Cionsystems ADMPro application Installed, please install “Microsoft Access Database Engine 2013 (32 bit).

After installing  Microsoft Access Database Engine, you have to do the changes in the IIS manager.

Follow the below steps for details:

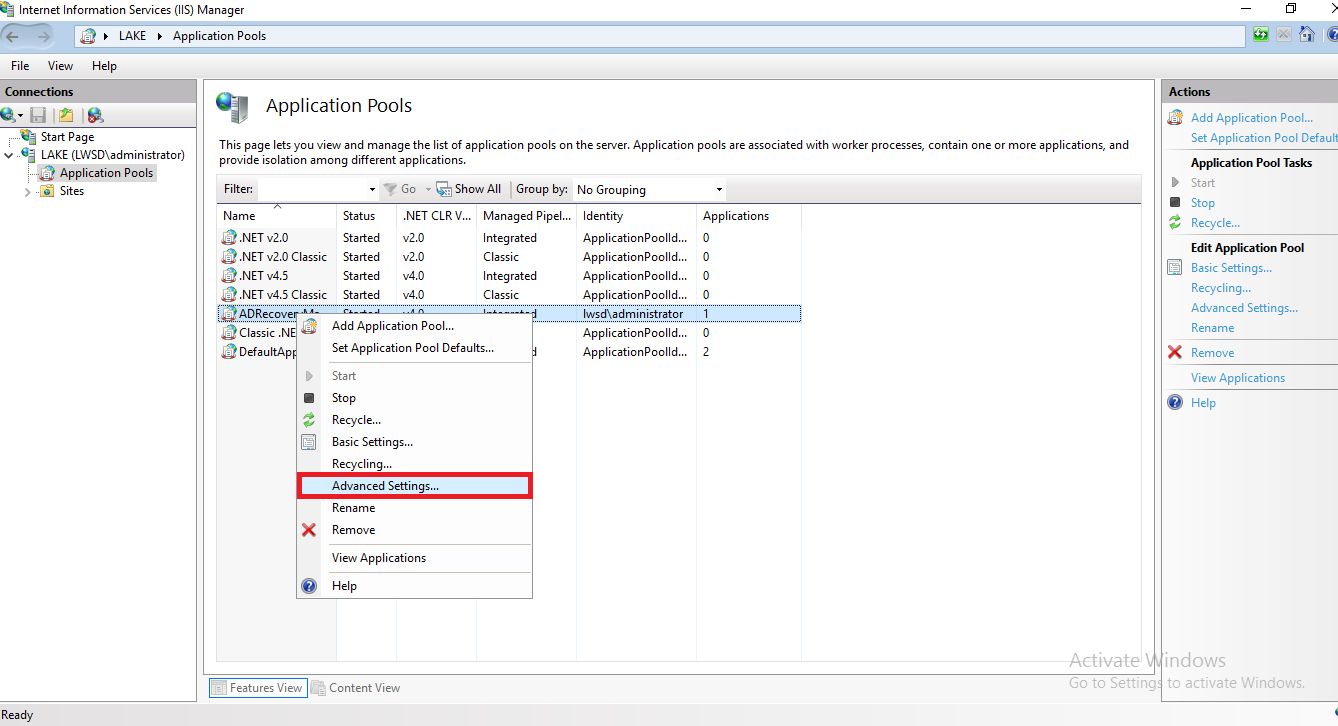
In Windows Server  Start -> Run ->type inetmgr —>Enter

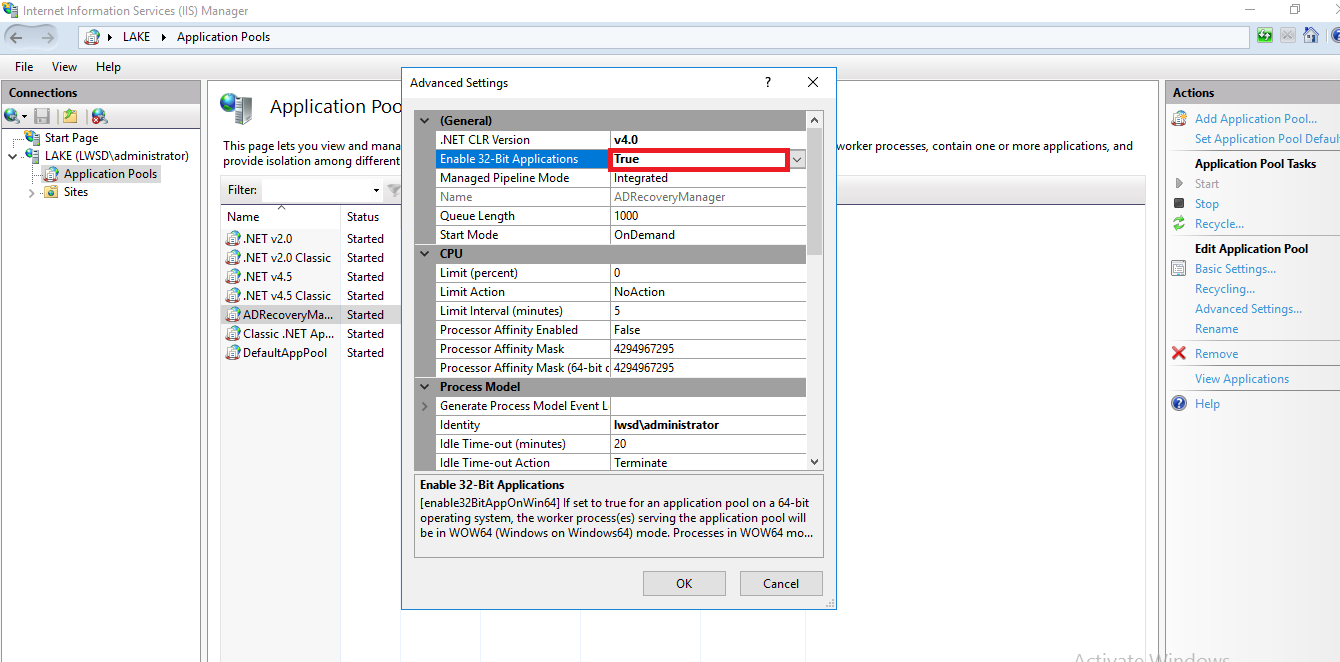
Go -> Application Pools -> Select ADManager Pro–> Right click and go to advanced Settings.

Change the value of Enable 32-Bit Application from False to True click on Ok button and restart IIS.

The password does not meet the password policy requirements.Exception from HRESULT: 0x800708C5

Error while changing the AD user password (Change required in GPO policy)

You will get this error while changing the password of Active Directory user directly by using native AD tool or from Cionsystems Enterprise SelfService or ADMPRO Applications.

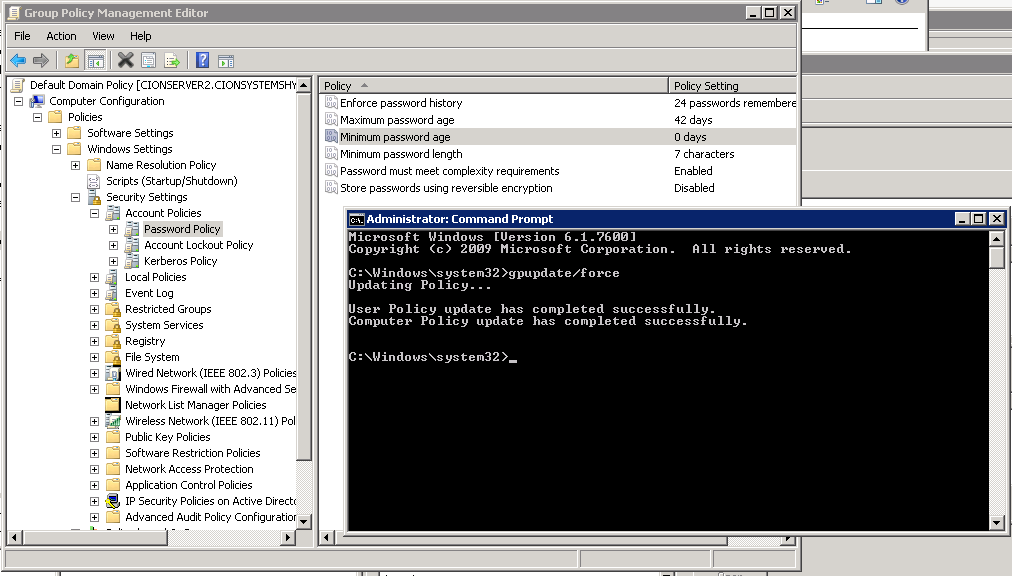
Resolution : In Domain control “Default Domain Policy “ Set the “Minimum password age” to 0

Follow the below steps for details (Image attach for reference)

In Windows server 2008R2 Start -> Run -> gpmc.msc

Go to Domains -> domainName(cionsystems.com) -> Select Default Domain Policy , right click and edit

Select Computer Configuration -> Policies -> Windows Settings ->Security settings -> Account Policies -> Passowrd Policy -> Set “Minimum password age” to 0

Open Command prompt as administrator gpupdate/force

CionSystem Selfservice Password reset

CionSystem Selfservice Password reset